New Hire Guide

New Assistant CSR In-processing

  • Get hired. See Bonnie Bingham.
    • Information/contact card
    • ODH Policies and Procedures document
    • Wait for hiring permission from Student Employment before beginning work

    Regular meetings

    • Bi-weekly staff meeting 1161 JFSB
    • Annual employees meeting & breakfast (usually 2nd week of school)

    Access

    • 2-2600 Humanities computer help line
    • byu.edu trouble ticket system
    • Door code for access to ODH offices and labs change each semester
    • Master key
    • Outlook account for email and work schedule calendar (hum-help user)
    • Standard workstation password
    • OIT CSR role – call 2-4000 with net ID
    • Add to AD groups:
      • local/Humanities/HUMANITIES-CSR
      • local/Humanities/Hum-SMPTech (this grants access to files.byu.edu)
    • Print badge and give them holder and lanyard
    • Make admin user on Hum Computer Support Wiki*
    • Can get campus VPN access if needed

    * Go to humcsr.byu.edu. Login with net ID, Users > Add New. Add the user; they must accept email invitation. Then you have to go in and change that person’s role to Administrator.

    Clocking in and out

    • Use student ID number (not net ID)
    • Clock in and out using:
      • Y-Time in BYU Mobile App
      • Office phone
      • Wall clock in NE and SW lobbies and by elevators in the JFSB
      • Web site

Duties & Responsibilities

  • Take computer-related phone calls from faculty and staff
  • Troubleshoot hardware/software problems on both Windows and Mac Operating Systems
  • Looking up (Googling) or asking someone else about anything you don’t know
  • Have familiarity with both Windows and Mac hardware and typical software instillations:
    • For Windows
      • Use of Control Panel
      • Access BIOS and Boot Menu
      • Access and edit Registry
    • For Mac
      • Familiarity with System Preferences
      • How to use Disk Utility and File Repair Permissions
      • Ability to access different boot options
    • Have familiarity with general troubleshooting techniques and tools
    • have good interpersonal skills
    • College-wide hardware/software deployment and installation
      • Imaging both Mac and Windows computers for the college
    • Find and remove viruses and spyware that bypass existing virus protection
    • Transfer data from old computers to new ones using
      • Crash Plan
      • Hardwired connections/external HDs
    • Setting up CrashPlan on new devices or preexisting ones
    • Accessing servers and setting up shared drives
    • Setting up and installing printers/drivers
    • Being familiar with and using HelpDesk
      • Creating jobs
      • Adding history
      • Resolving jobs
      • Sending memos
      • Devices
      • Clients
    • Memorizing the numerous passwords associated with the humsupport accounts
    • Setting up/installing applications from software.byu.edu, SoftwareCenter, and \\files.byu.edu
      • Connecting Microsoft Outlook accounts for professors and student employees
    • Getting a feel for what we handle vs. what is OIT’s job. (Hint: we service department conference rooms, but not classrooms or auditoriums or projectors.
    • Surplussing and Nuking computers

Expectations

As you assist professors, always remember to be courteous! You will come to know a select few professors very well, and others you may never hear from, except when replacing their computer! OFTEN professors will need urgent assistance with something and will forget to give you the due respect as a human, but DO NOT, under any circumstances, be disrespectful. If you feel you are about to snap because of how a professor is treating you, respectfully tell them that you will have someone else assist them, and excuse yourself.

Ofttimes professors can be very set in their (respectfully) wrong way of treating their equipment or programs. It’s okay to be firm and help them change their paradigm, but again, remember to be respectful.

Rules of the Office

The office should appear to be a professional working environment to all professors and all who pass by in the hallway.

Rules of Conduct

  • Always ask permission before remotely connecting to their computer (via VNC).
  • Do not snoop around faculty members’ files.
  • Respect professors’ privacy. Call before using their computer. Know before entering, etc.
Posted in CSR Documentation | Comments Off on New Hire Guide

Using BYU Cloud Apps/Citrix Workspace

Most of this info is from OIT: https://it.byu.edu/it?id=kb_article&sys_id=28a3b07edb9fbf80a5a627ba4b9619c7

BYU Cloud Apps allow all students, faculty, and staff to access BYU-licensed applications running on remote servers in our datacenter for coursework and business needs. These applications can be accessed and used on any device or Operating System, including Windows, MacOS, Linux, iOS, Android and Chrome OS. Access to cloud storage, such as Box, Google Drive, Dropbox, and OneDrive is also available in this environment to enable personal data storage.

Cloud Apps functions by opening a “session” with a Citrix server. A session is essentially a connection with the user’s computer and the server. The user’s computer shows the application and the work being done; however, the actual instance of the application and work within it is being done on the server.

Internet access is required to access these applications.

Access BYU Cloud Apps

All BYU students, faculty, and staff that want to access an application using Cloud Apps can do so in two ways:

Note: Data will not save in the applications unless correctly setup. See saving data in Cloud Apps

1. (Preferred Method) Access through the web browser

  1. Using a browser navigate to cloudapps.byu.edu
  2. Log in using NetID@byu.edu and password
  3. At the top of the screen select the Apps tab.
  4. Select the App you wish to run

Note: This method does not function on mobile devices

2. Install the desktop program

  1. Download the and install the Citrix Workspace app from https://www.citrix.com/downloads/workspace-app/  (Do Not Enable Single Sign-on: if enabled you will have to uninstall then reinstall workspace to fix the issue it causes of needing to be tied to the domain)

Alternatively: Install Citrix Workspace from Self Service on Macs / Software Center on Windows.

  1. Enter https://byuapps.cloud.com as the server address
  2. Sign in with your NetID@byu.edu and password
  3. At the top of the screen select the Apps tab.
  4. Select the App you wish to run

Note: This method is best for mobile devices, those needing to access local hardware, or those who wish to display Cloud Apps in a separate window.

Saving and Accessing Data in BYU Cloud Apps

A user cannot store their files or data on the server. This is because everyone who uses Cloud Apps accesses the same set of servers. If saving on the servers were allowed, servers’ storage limit would be reached quickly. Users can save their data to cloud storage locations such as Box using a service called Kumo to link users to their cloud storage. Cloud storage is (are) a place(s) where users can store their files or data that is not on their personal computer. A common example is Box. The documents in Box are stored in Box’s storage and accessible from anywhere with an internet connection. Once a user has set up their cloud storage in Kumo, they can save or open any files from Box, Google Drive, OneDrive, and Dropbox in any Citrix Application.

Setup: 

  1. Navigate to kumo.byu.edu
  2. Log in with your BYU Net ID and password
  3. Expand and authorize the cloud storage providers you would like to have access within Citrix

Note: A green check denotes that you have authorized this cloud storage.

Access Cloud Storage:

Once a user has authorized cloud storage they can open or save files in their authorized cloud storage, in any application.

Note: The process of opening and saving files will vary slightly depending on the application. In general, most cloud storage locations such as Box can be found by navigating the file explorer to find the cloud storage.

1. Connect to Kumo.byu.edu
      a.  Navigate to Kumo.byu.edu
      b. Log In with your NetID and associated password
      c. Select your preferred storage option
      d. Select authorize
      e. Follow authorization instructions given with each service
2. When saving a file select save as
3. Browse through the file explorer to find This PC
4. Select Box or a different cloud storage option
 
5. Save to your desired location within box.
Posted in General | Comments Off on Using BYU Cloud Apps/Citrix Workspace

Microsoft Office Setup

Word (and Powerpoint, Excel… etc.) For Anyone:

Click on Word (or any of the other applications) and it should prompt you for a Microsoft sign-in username. Put the person’s netID@byu.edu, and it should redirect to a BYU page asking for their password. After they enter their password, it should redirect to a Duo push (which won’t be remembered for 30 days even with the checkbox) and it should sign in.

Remember that each person can only have 5 devices that are signed in with their account, so if you are loaning a laptop to a professor, try to have them sign out of the laptop after they are done using it.

Outlook Application For Professors:

Either on Mac or Windows, you should just be able to enter their NetID@byu.edu and it should work. If it fails to connect on Mac, you can try it with the server as mail.byu.edu, and the Domain as BYU\netID@byu.edu but usually if you got to this step, its a bad internet connection or they entered their password wrong.

If all goes well it should ask for a Duo push (which won’t be remembered for 30 days even with the checkbox) and it should sign in.


Outlook Online for Professors:

If the professor is used to getting to their email through the Web App, or if Outlook refuses to work, email should always be accessible through their favorite browser. This is also a good way to check if Outlook is broken or if they just don’t have an email account yet (sometimes it takes a few days if they just got hired).

  1. Open their favorite browser
  2. Go to office.byu.edu
  3. Have them sign in and do the Duo push
  4. Click on the Outlook icon on the top row
  5. It should open their email in the Web App, which you can now bookmark for them if they want


Downloading Office:

Office should already be on every computer by default (through the initial imaging), but if you need to re-download it to fix it or upgrade etc. then:

  1. Go to office.byu.edu
  2. Have the professor sign in and do the Duo push
  3. In the top right, there should be a button that says “Install Office”
  4. Click it and then “365 apps”
  5. A install file should start downloading
  6. Run it, and you will have to have the person sign in again (instructions above)
Posted in General, Software | Comments Off on Microsoft Office Setup

humprint

humprint.byu.edu is a Windows 2012 server that has most of our printers added and then shares them with users. To access it use Microsoft Remote Desktop and the hostname. There is a GPO for each department that adds the printers and copiers. Since most departments have a copy code for each professor, we can’t add it there and we need to still add that code for the Sharp copiers to work.

Adding a New Printer

Go to the Control Panel, Devices and Printers, Add a printer (just like when you add a printer for a professor).
Then right click on it and select Printer Properties, then click on the Sharing tab. There is an option to “List in the directory,” which will add it to the campus directory of shared printers (not sure where it actually stores stuff), but we’re not currently doing this. You now need to create a GPO.

Adding Printers with a GPO

Using the Group Policy Manager, go to the department folder where you want to create the GPO.
Right click and select “Create a new GPO and link it here.”
Go to User configuration, Preferences, Control Panel Settings, Printers. Right click on printers, new, add TCP/IP printer.
Select “Use DNS name,” enter the DNS name of the printer (e.g. gscopier.byu.edu). under printer path enter the shared name as it shows on the print server (e.g. \\humprint\German & Russian Copier (SHARP MX-5001N))
Under User Configuration, Policies, Windows Settings, click on Deployed Printers, Deploy Printer and enter the printer name matching the full name (\\humprint\German & Russian Copier (SHARP MX-5001N)), and add it.
Apply and ok those windows.
Back on the GP Manager select the GPO and add humanities-csr to the users and groups with permissions and give it edit permissions.

Posted in General, Printers | Comments Off on humprint

How to Fix Broken Audio (Red X) on Windows 10 AIOs

We’ve been seeing the Windows Audio service on Windows 10 break on a lot of the 7440/7450 AIOs, especially when the user isn’t an Administrator (Adjuncts, part time secretaries, etc). No sound comes out of the speakers or audio jack and it looks like this on the taskbar:

Image result for windows audio with red x

Double clicking on the icon and putting in Admin credentials fixes it temporarily, but it breaks again after a while (usually after restarting the computer).

To permanently fix this, log into the humsupport account:

  1. Run “services.msc” from the Start/Run menu
  2. Double Click on the Windows Audio Endpoint Builder service
  3. Go to the Recovery tab
  4. Change Subsequent Failures to Restart the Service and hit Apply
  5. Restart the computer

The sound should be working upon restart and stay working upon subsequent restarts.

Posted in CSR Documentation, Windows | Comments Off on How to Fix Broken Audio (Red X) on Windows 10 AIOs

Setting up a VPN Account

A VPN (virtual private network) allows users to access secure BYU websites (such as Y-Expense) from any network, including home and international networks.

Setting up new VPN:

  1. Go to it.byu.edu
  2. In the search box next to the login box, type “VPN” and click the magnifying glass.
  3. Click the resulting link “Virtual Private Networking (VPN),” usually the first one. This will take you to the Virtual Private Networking order page.
    Or just click on the link below:
    https://it.byu.edu/byu/sc_help.do?sysparm_document_key=kb_knowledge,b0c288300a0a3c0e11ddf116b98ff60f
  4. Click Order, then select “VPN Order” from the drop down menu.
  5. If you haven’t already authenticated earlier to BYU with another application or web page, you’ll be asked to authenticate. Enter your NetID and password.
  6. Fill in the appropriate boxes. It doesn’t matter who orders the service, but could often be the CSR).  
    1. On the bottom section under Administrative Access is where you enter who the account is for.
    2. Most people will just need General Campus Access.
  7. Click the “Instant Order” button on the top right. The person for whom it is ordered should get an email from OIT showing the request has been made and another one when it has been fulfilled, usually within a few minutes.
  8. Once the account is ordered, download the Cisco AnyConnect client:
    1. For Windows, Mac OS, or Linux desktop systems, download from OIT’s software page:
      https://home.byu.edu/webapp/softwareDistribution/shop/searchResults/vendor/Cisco%20Systems.htm
    2. For iOS go to the App Store and search for Cisco AnyConnect.
    3. For Android go to the Google Play store and search for Cisco AnyConnect.
  9. The first time you launch the Cisco AnyConnect client on your computer or device, it will ask for a server address. The address to use for General Campus Access (almost everyone) is:
    cmps-vpn.byu.edu
  10. After that, when you choose Connect, it will ask for your BYU Net ID and password, and you should be connected.
Posted in General | Comments Off on Setting up a VPN Account

Allowing Apps on Mac

If you ever get the message

109831

It’s because our image doesn’t allow faculty to download apps from “Anywhere.” To open the application, right click (or Ctrl+Click) and choose “Open.”

109834


The popup will happen again, but it will also have “Open” as an option now.


109832


Alternatively, you can open System Preferences


109799-640


Go to Security & Privacy > General


109804-640


And after you’ve cancelled the popup from the first image, a message will show up saying something along the lines of

Capture

Click “Open Anyway.” It will bring up image 3 again for you to click “Open” in the popup.

For one final solution, you can allow apps from anywhere from the terminal.

sudo spctl –master-disable

The next time you open System Preferences, the “Anywhere” option will not only be listed but also selected, allowing you to install apps from any source whatsoever. If this unfettered access begins to worry you, you can reverse course and hide the “Anywhere” option with this Terminal command:

sudo spctl –master-enable

Sources:

http://www.iclarified.com/28180/how-to-open-applications-from-unidentified-developers-in-mac-os-x-mountain-lion

https://www.cnet.com/how-to/3-ways-to-install-apps-from-unidentified-developers-on-macos-sierra/

Posted in CSR Documentation, General, Mac, Software | Comments Off on Allowing Apps on Mac

Installing Pharos Open-Access Printers

NOTE: This is only for Windows. On Macs, you can open Self Service and it’ll be under Printers on the left hand sidebar.

Pretty much all of the Adjuncts in the JKB need access to the Pharos Open-Access Printers (BYU Public Color/B&W) in the hallways.

Open a web browser, go to software.byu.edu, sign in.

On the left hand side under vendors, go to Pharos

Click Download Now next to the Pharos driver you need (Windows 64-bit)

Hit the + to expand the Open Access Print Driver (Pharos) at the top of the list in My Downloads. Click Continue (external site), it’ll start downloading.

Run the EXE. Follow the installation dialogues.

Restart might be needed to get it working

Posted in Printers, Windows | Comments Off on Installing Pharos Open-Access Printers

Common Fixes for Outlook on Mac

From OIT:

These connection problems are very common on Macs, but unfortunately we haven’t found a single solution that fixes them all.  Here is a list of the most common fixes:

  1.   Reconfigure wifi/network settings:

https://answers.microsoft.com/en-us/msoffice/forum/msoffice_outlook-mso_mac-mso_mac2016/outlook-mac-says-not-connected/20fded85-ee20-460f-b540-92286609b303

  1.   Delete the Outlook cache:

https://answers.microsoft.com/en-us/msoffice/forum/msoffice_outlook-mso_mac-mso_mac2016/intermittent-server-disconnects-from-outlook-for/5b15bb0f-f04c-4c6e-b078-fa18c1552275?auth=1

  1.   Delete the KeyChain entry:

https://answers.microsoft.com/en-us/msoffice/forum/msoffice_outlook-mso_mac-mso_mac2016/office-2016-mac-outlook-will-not-connect-to/fca00b50-aae5-4549-ae2e-ca46ea563c59

  1.   Do a full uninstall/reinstall (including library files):

https://support.office.com/en-us/article/troubleshoot-office-2016-for-mac-issues-by-completely-uninstalling-before-you-reinstall-ec3aa66e-6a76-451f-9d35-cba2e14e94c0?ui=en-US&rs=en-US&ad=US

  1.   Remove Outlook profile and then add it again
  2.   Update Outlook to the latest version

Also seen problems solved on early versions of Mac OS High Sierra by upgrading to High Sierra v10.13.3

Posted in Email, Mac, Software | Comments Off on Common Fixes for Outlook on Mac

Beginner’s Guide to HelpDesk

by Mark Lindley, edited by Bekah Fowles

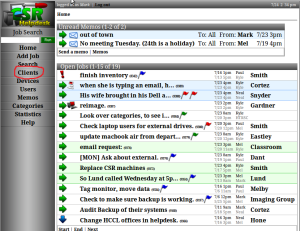
Helpdesk is our supporting website that you will be using every day. You can access it by this hyperlink: https://humhelp.byu.edu/ . This site is where we access all the inventory of computers used by professors, surplus machines, job records, etc… So in short this is the most important website you will be using. You will become very familiar with it very quickly.

Within Helpdesk you will being these four things quite often:

  • Adding a job
  • Resolving a job
  • Looking up a person
  • Finding a device

You will get the hang of this quickly as you will be doing this many times.

Adding a Job

When a professor, or staff member, contacts you it is important to assist them in their computer needs. During or after you have resolved their issue you will make a job record on Helpdesk. The purpose is so Devin and the other CSRs can have a record of what technical issues professors and staff have encountered in the past as well as current or ongoing issues that need to be resolved.

*Note: It is okay if you are not able to help a professor through in resolving their computer issue. You will still make a job and leave it posted so others can review it and provide further assistance.

In adding a job you need to:

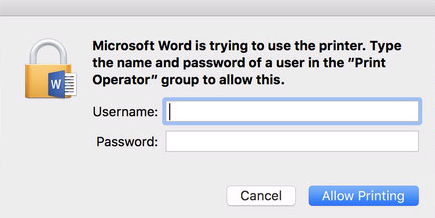
1. Sign in to the Helpdesk website.

hd01

2. Click in Add Job, on the left grey panel.

hd02

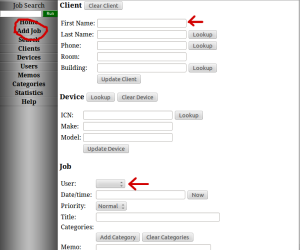
*Note: with the above image with the top red arrow, you will:

3. Write the professors first name.

4. Click on the ”lookup” client button.

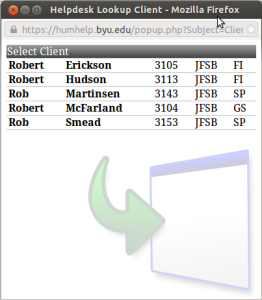
5. Select the correct name by clicking on it.

hd03

*Note: After you clicked on the name you will return back to the page you prior.

6. Add a memo (Memo is a job description about what the issue is (or was) and what you did to resolve it).

hd04

*Note: You will also be inputting your name and a timestamp.

*Note: If a professor has an issue that is time sensitive, write the Day (and/or date) and time in the “Title” so others will be notified about it.

Resolving a Job

Resolving a job is simple. You will:

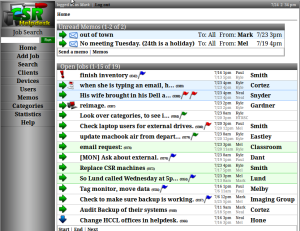
1. Click on the job title itself.

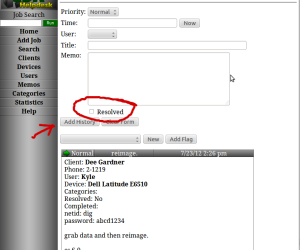
2. Click on “Add History”.

hd05

3. Type in the memo what you did to resolve this job.

4. Check the “Resolved” box, this will be recorded with the job

5. Click on the ‘Add History’

hd06

That is how you resolve a job in Helpdesk.

Looking up a Person

Looking up a person is a common occurrence when working here. You may need to look up a person to find out their office, remoting into their computer (via VNC) to support them, or knowing what computer they are using, etc…

You will:

1. Click on “Clients” located on the left side on the grey panel.

hd07

2. Type the professors, or staff members, name.

hd08

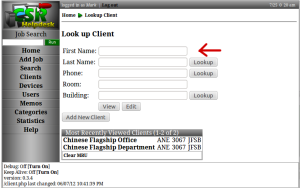
*Note: You can type either their first name or last name.

3. Click “Lookup”.

4. Select the appropriate professor’s name.

hd09

5. Click on “View” so you can view their information.

That is how you will look up a person.

Finding a Device

Finding a device on Helpdesk is important so you do not confuse the device with another device. This also allows you to keep track of the devices history.

You will:

1. Select “Devices” on the left grey panel.

hd10

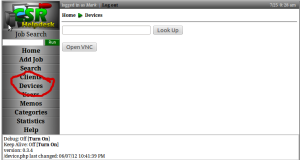
2. Type the **ICN number here.

**The ICN number is a blue and white sticker, with a set of numbers like 1-*****. The ICN number is on the all devices except mice and keyboards

3. Click “Lookup” after typing in the ICN number.

*Note: The page will load the device and its details.

Posted in CSR Documentation | Comments Off on Beginner’s Guide to HelpDesk