Since we have sensitive information (such as passwords) that we use in our documentation, we’ll need to start making certain posts private. Any time you wish to view these tutorials or access this information, you will need to sign in using the “Admin Login” button in the main menu. Please edit this post with an updated list for any private post.
Current Private Pages:
Printers List
Imaging a Windows Computer
Imaging a Mac Computer
Installing Microsoft System Center Tools (Remote Viewer and SCCM Admin Console)
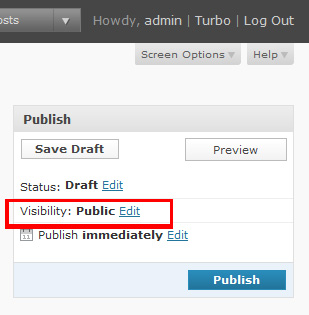
If ever you see a public post that has sensitive information, or are making a new post with sensitive information, please make it private by
Editing the post (or Add New)
On the righthand side where it says “Publish,” change the Visibilityto Private.
Update (or Publish).
Posted inGeneral|Comments Off on STICKY: Private Documentation
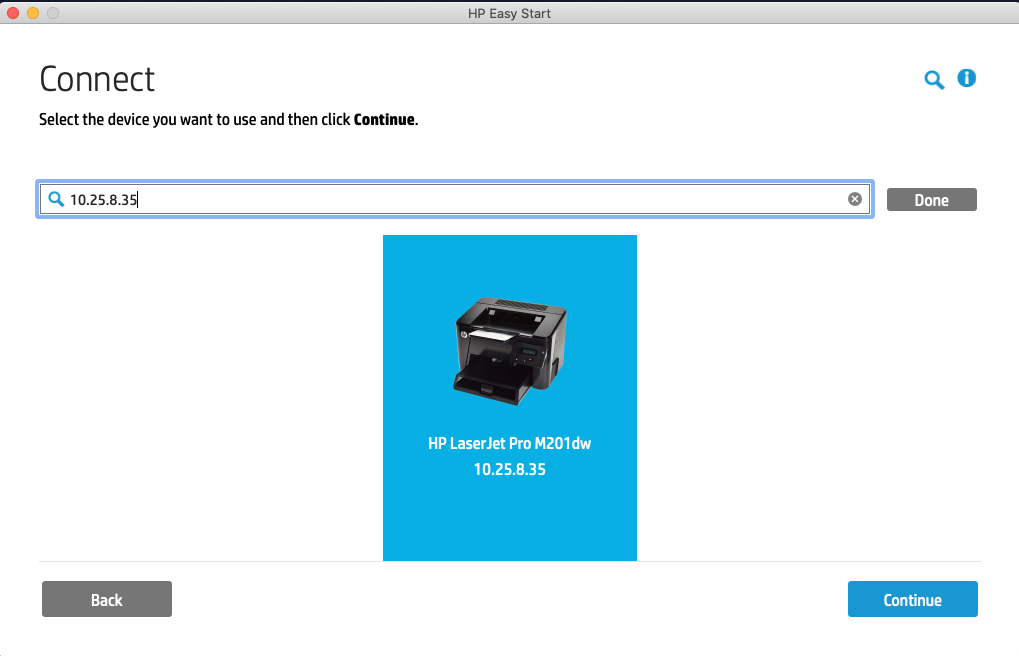
When you look up the printer model and go to the HP website to download the drivers chances are the HP website will make you download HP Easy Start. Download it and run it.
Using it is initially pretty straight forward. Just use the search button to search for the printer’s hostname or IP and select the correct printer. After that it doesn’t matter whether you select bonjour connection but the next step is the most important.
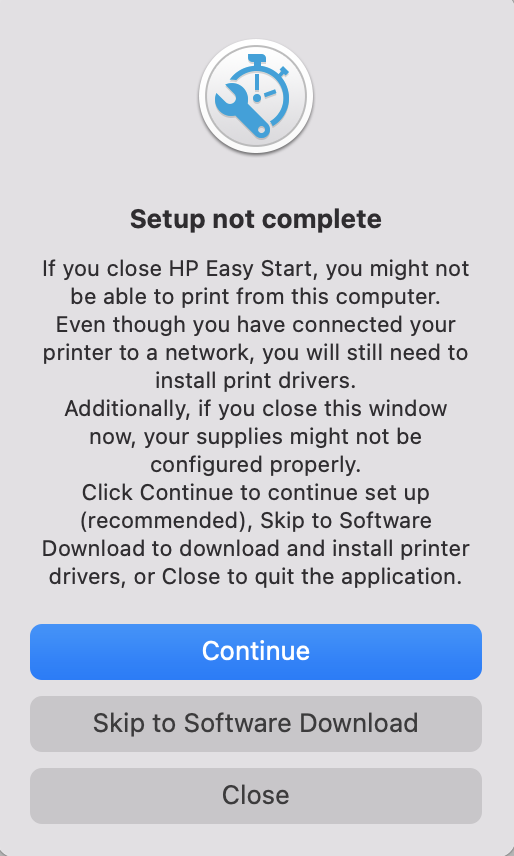
IMPORTANT! Once you see this page DO NOT click Get Software. Instead click the little red circle in the top left corner like you’re going to close the window. If you do not do this HP Easy Start will try and have you download more software from the App Store which requires an Apple ID.
Once you click the red circle with the x in it you should see a popup like this. Click Skip to Software Download to install the drivers. The rest should be pretty straight forward. I just wanted to make sure you all knew how to get around HP’s deceptive UI design.
Posted inPrinters|TaggedEasy start, HP, printer|Comments Off on Installing HP printer drivers with Easy Start on Mac
Go to humhelp@byu.edu, and if you are not already logged in to the CAS system, log in with your netID and password. You will be redirected to a page that looks like this:
Creating a Job
Usually, all new jobs that are for setting up new devices will be put in the system by Brad, so you do not need to worry about them. But if a professor calls or emails or comes in with a job that cannot be completed right then, then you need to create a job for it so it can be documented and resolved.
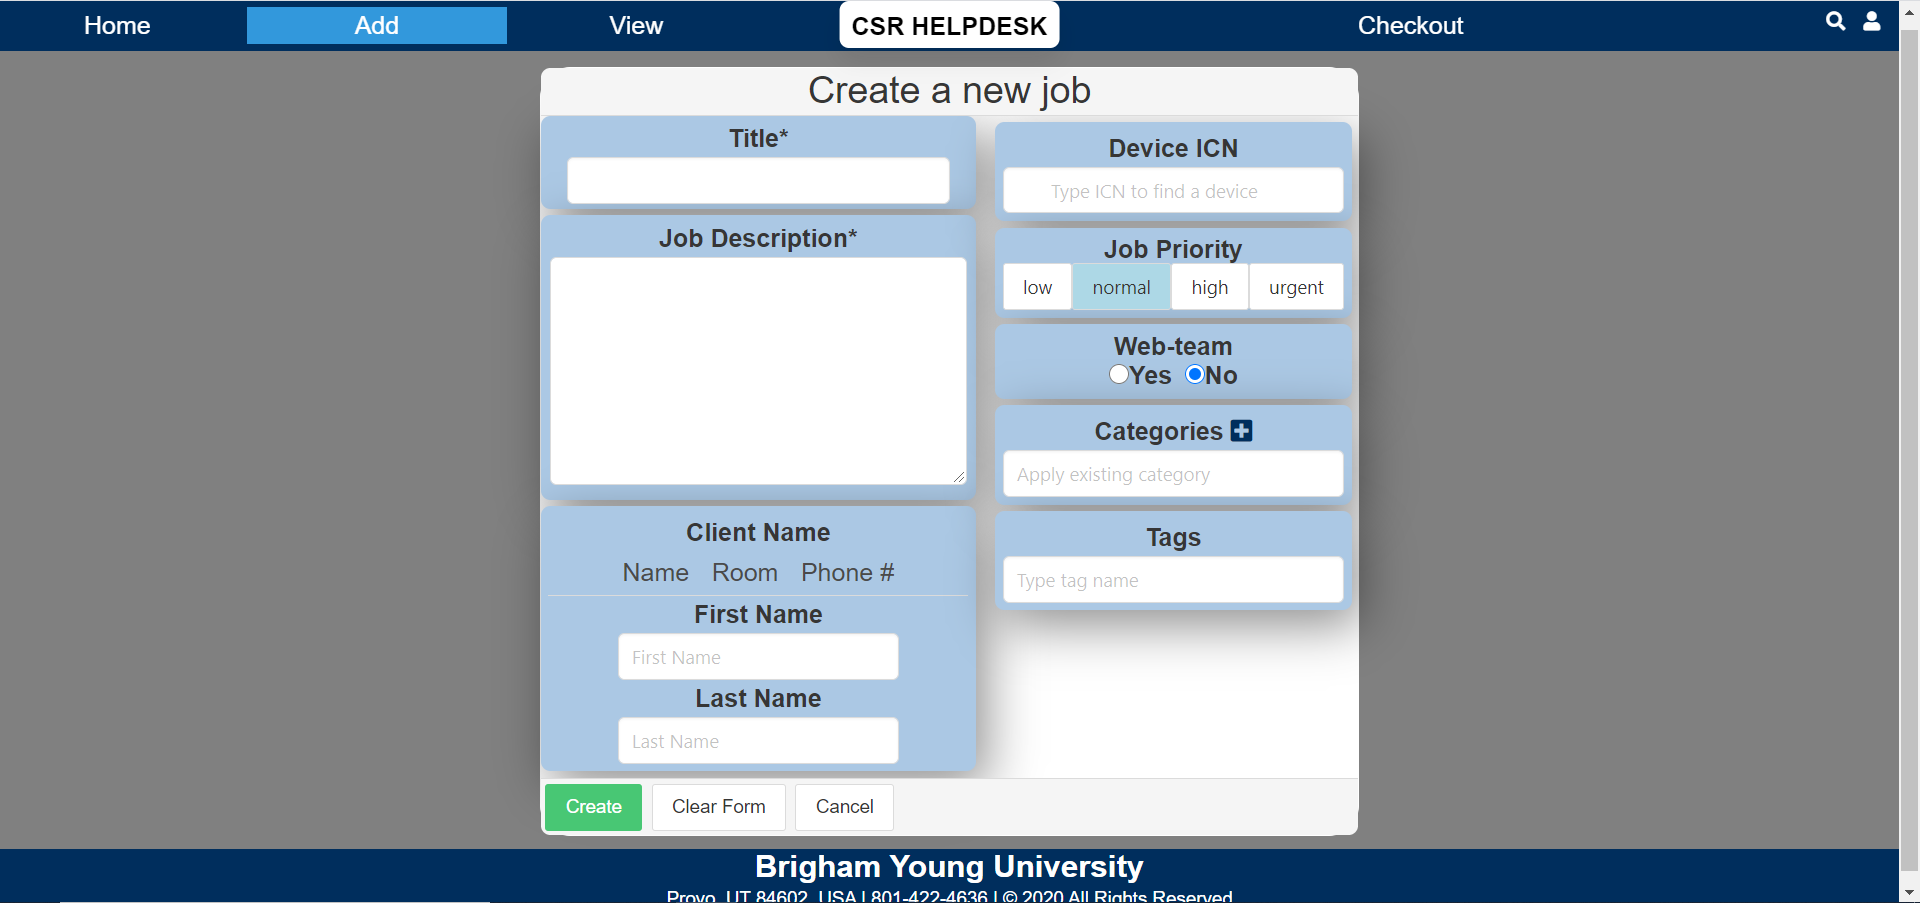
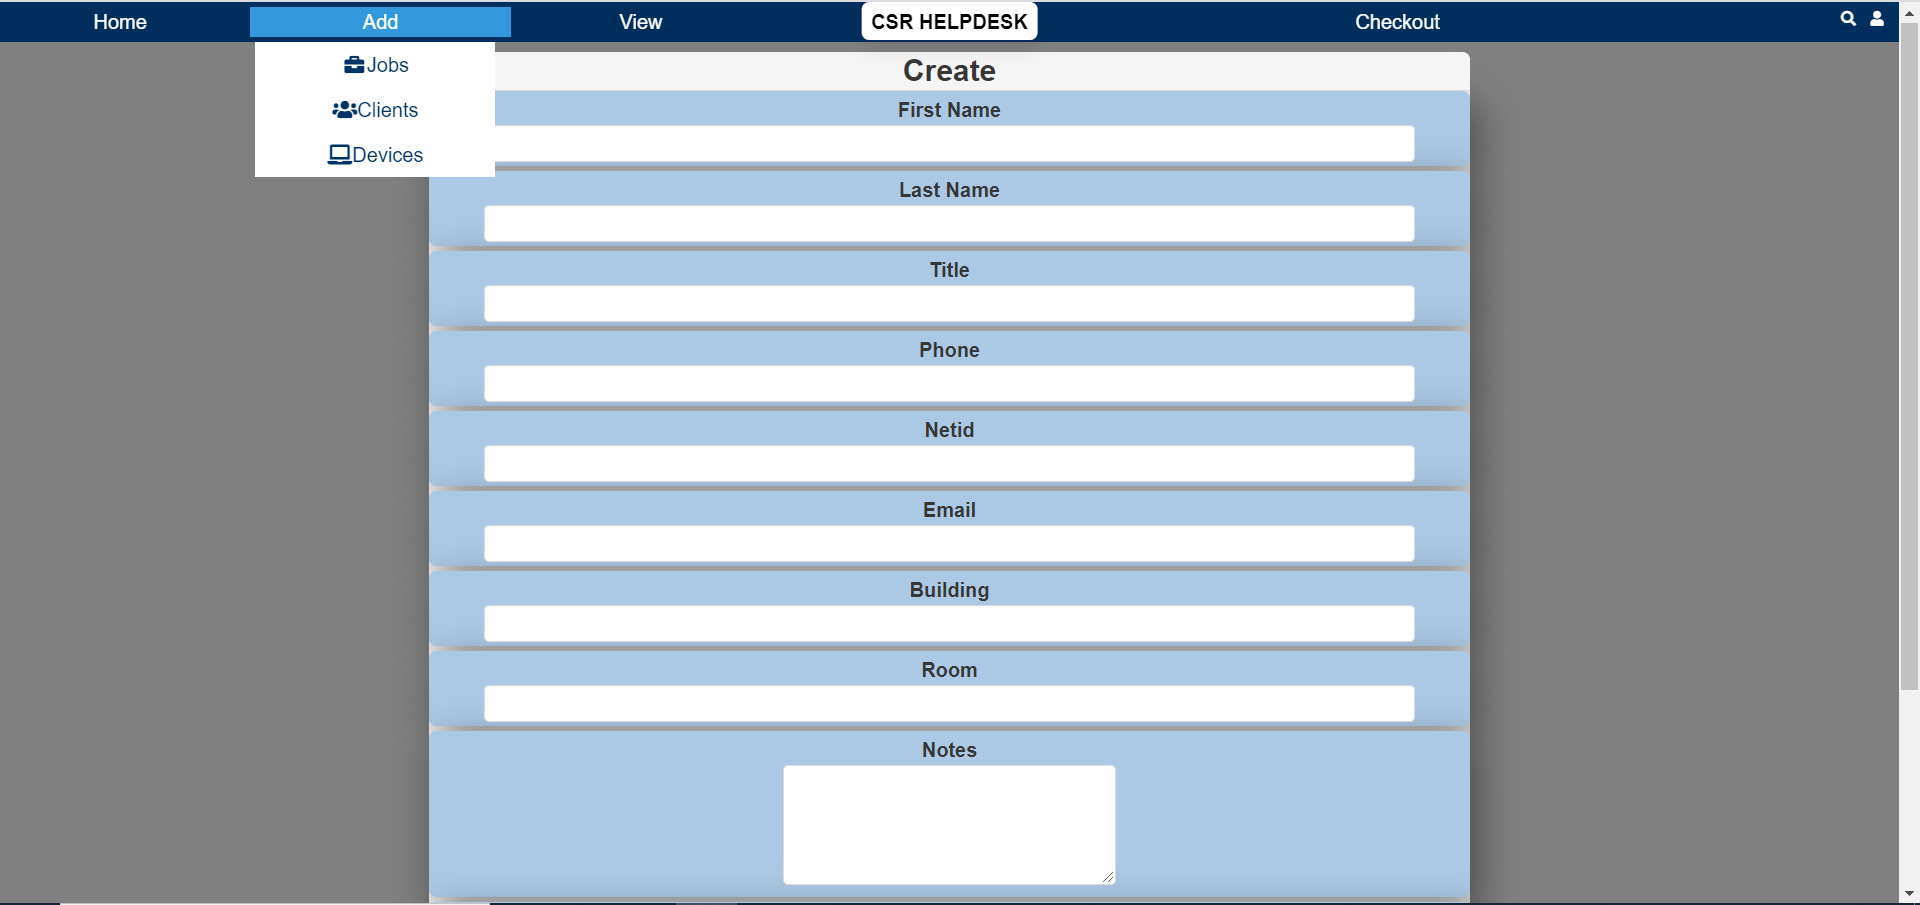
To create a job, click the “Add” button on the top panel, then click “Jobs.” You should see a screen like this:
Add a Title that describes the job simply like “Needs Help With Outlook” or “Computer Needs to Go to CougarTech.” If the job needs to be done on a certain day, add the day or date in brackets before the title. Like “[WED] USB Port Broken, Set Up Loaner” or “[Jan 15th] Deliver iPad to Office.” In the job description, outline the more specific details like what exactly needs to be done and what you have already tried.
Fill in the First and Last name of the professor you are working with, as soon as you start typing it will search the database and you can click their name in the drop down menu. You can also search them by their room# or phone#.
Leave the ICN box empty unless it is important to know exactly which device this job is for. Job Priority is almost always Normal, unless it is a job that must be done soon, then mark it as High or Urgent.
Leave the Web Team as “No” and the Categories and Tags empty unless you need to mark the job as something. Hit the green Create button at the bottom and you are all set to go. The job will be highlighted for a few days on the main page because it is new.
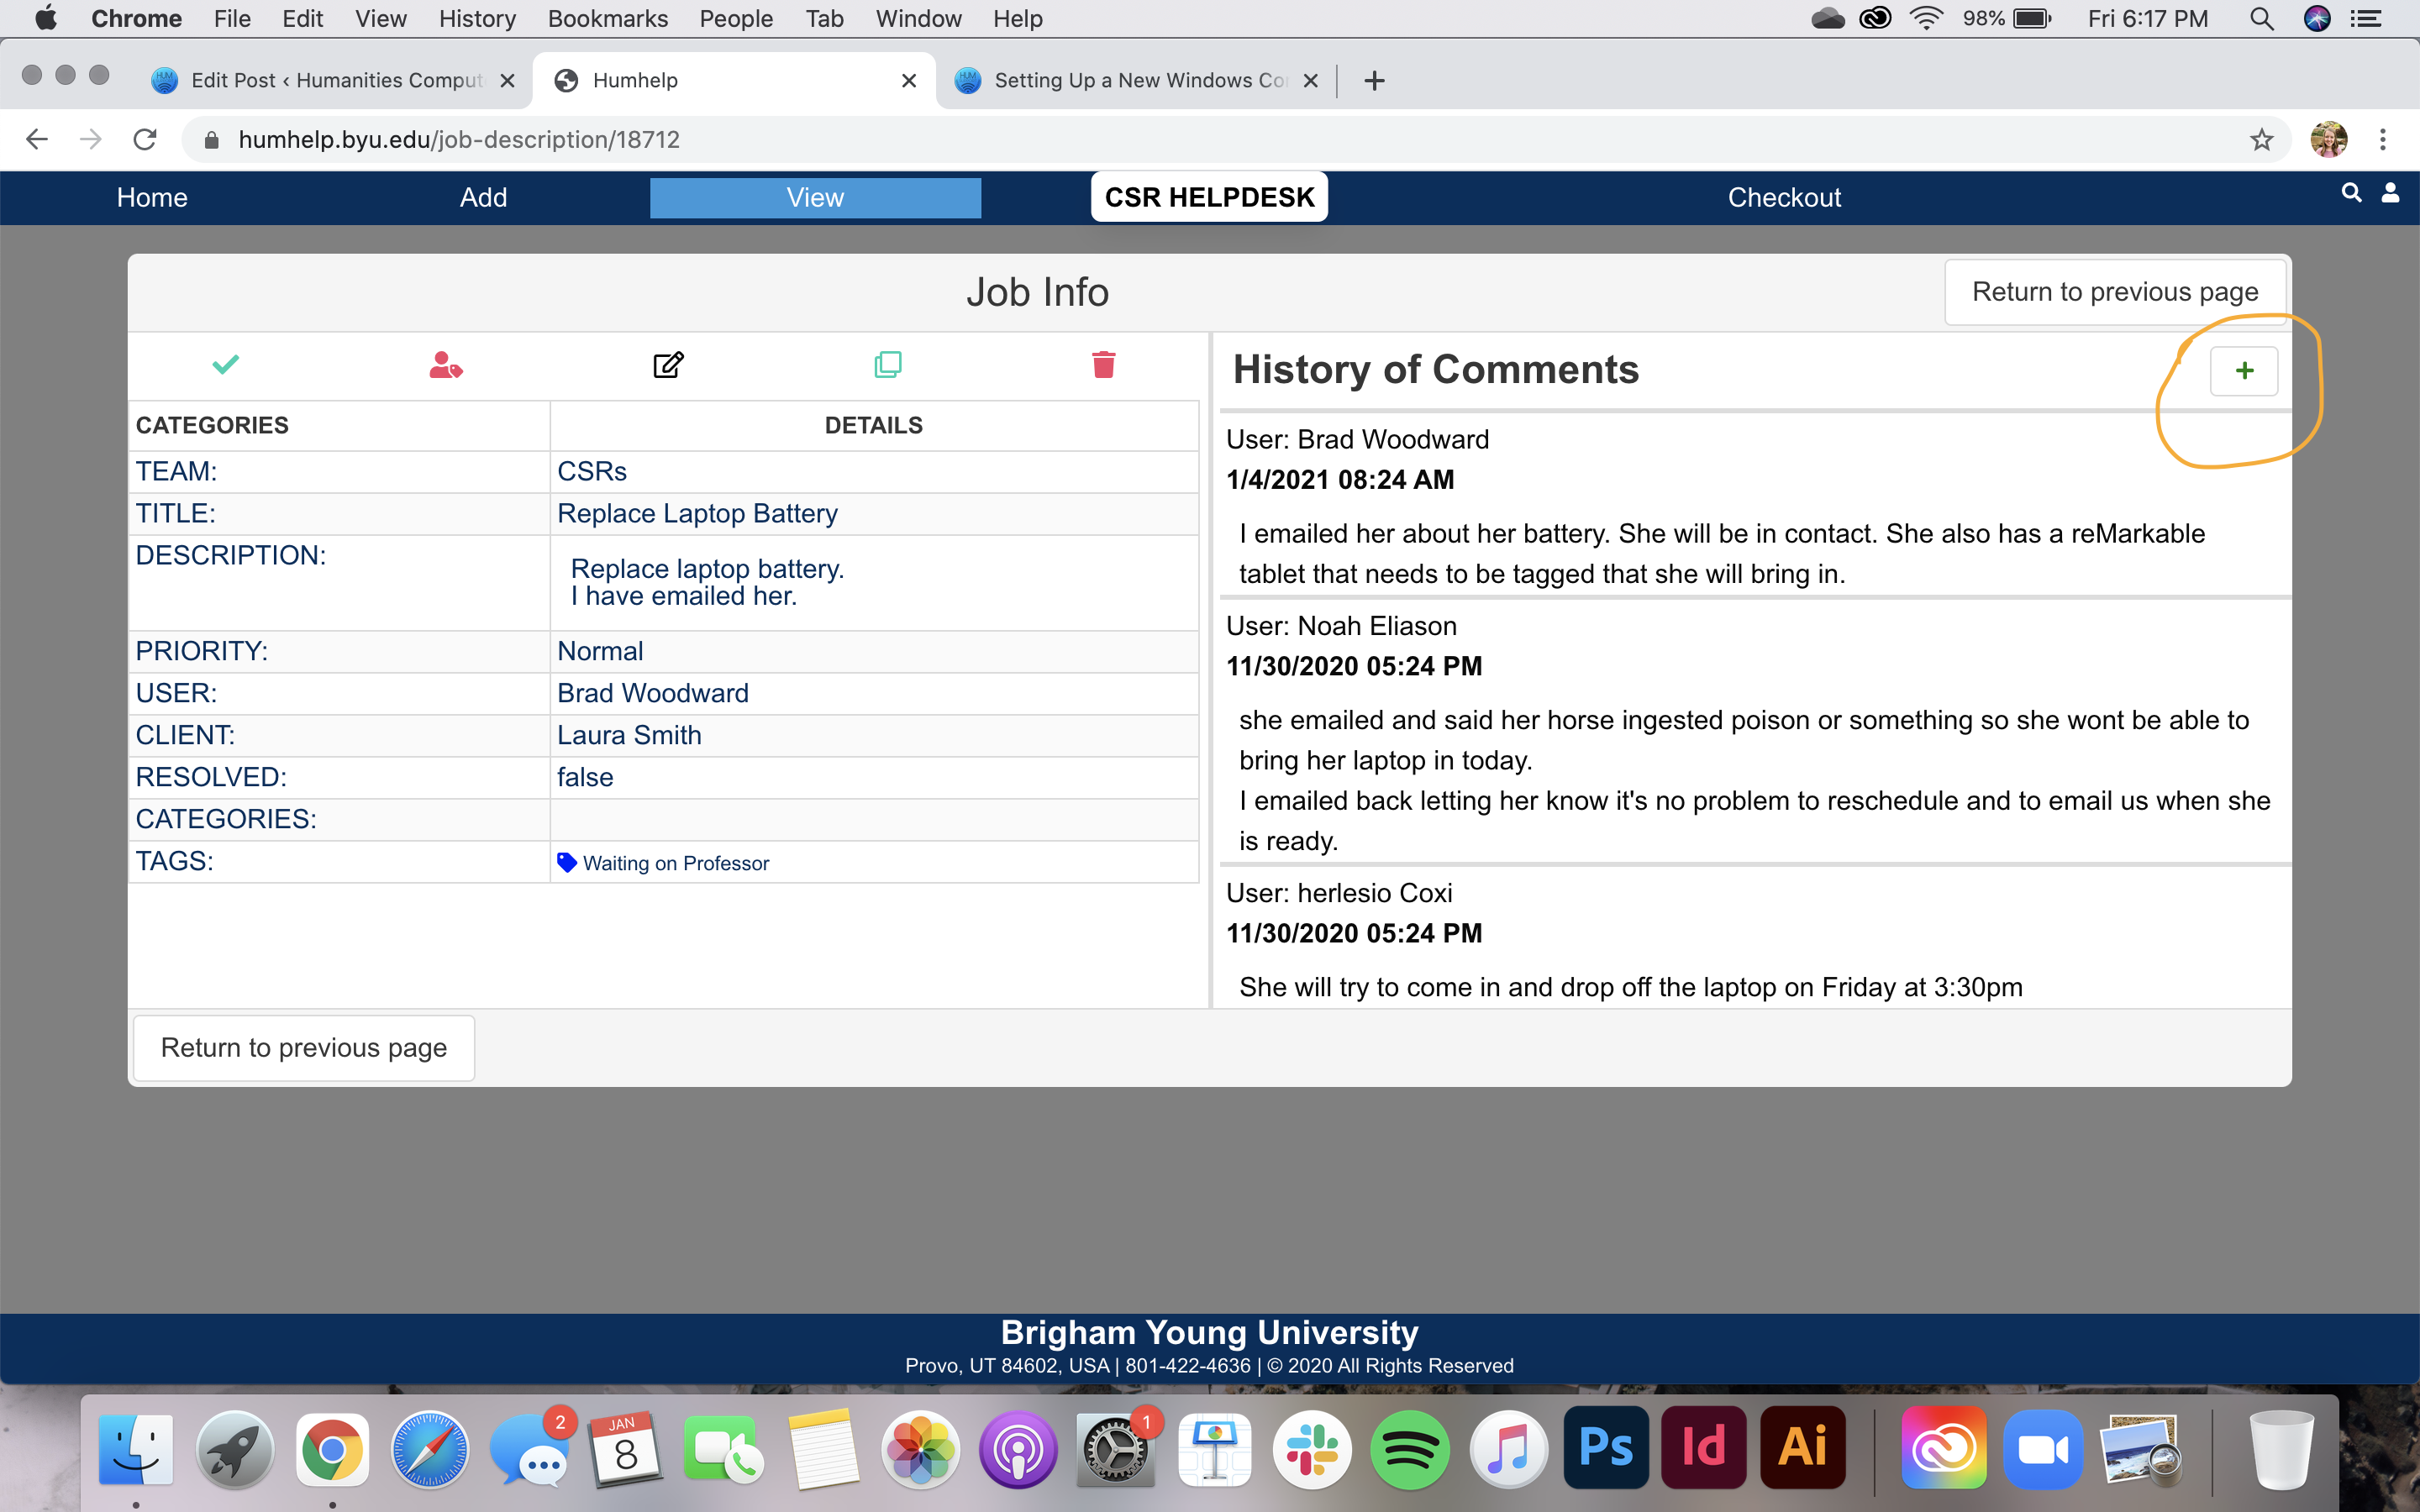
Commenting on a Job
Whenever you have been working on a job, or have completed it, it needs to be recorded in the job through comments. Especially when you are leaving for the day, make sure to document what you have done so others can pick up where you have left off. Make your comments concise but easy enough to read so that your co-workers can understand what still needs to be done.
Add comments by clicking the Plus button in the top right corner of any job:
Creating a Client
You only need to do this if there is a new professor that just got hired. Most professor should already be in the system. Also, Adjuncts are not in the system by name, so search them by room or phone number instead. But if you need to add a Client, click “Add” at the top bar and then “Client.”
Fill out their information. Title is usually left empty unless they prefer Dr. or Mr. or something. try to get their netID as well if you can. If not you can search for it on the crashplan website as well. Leave the notes and tags empty. Make sure to put them in the right Department by clicking it at the bottom of the screen. Click Save Client and you are done.
Adding a Device
The easiest way to do this (especially when you are setting up a new computer for a professor) is to click on the client you are adding a device to, then click the little computer symbol in the top bar. It will say “Add device to this client” if you hover over it.
Now follow the directions for adding a device outlined in the Windows Imaging Document (https://humcsr.byu.edu/2017/03/03/setting-up-a-new-windows-computer/).
Checking Out Devices
Posted inGeneral|Comments Off on How to Use HelpDesk
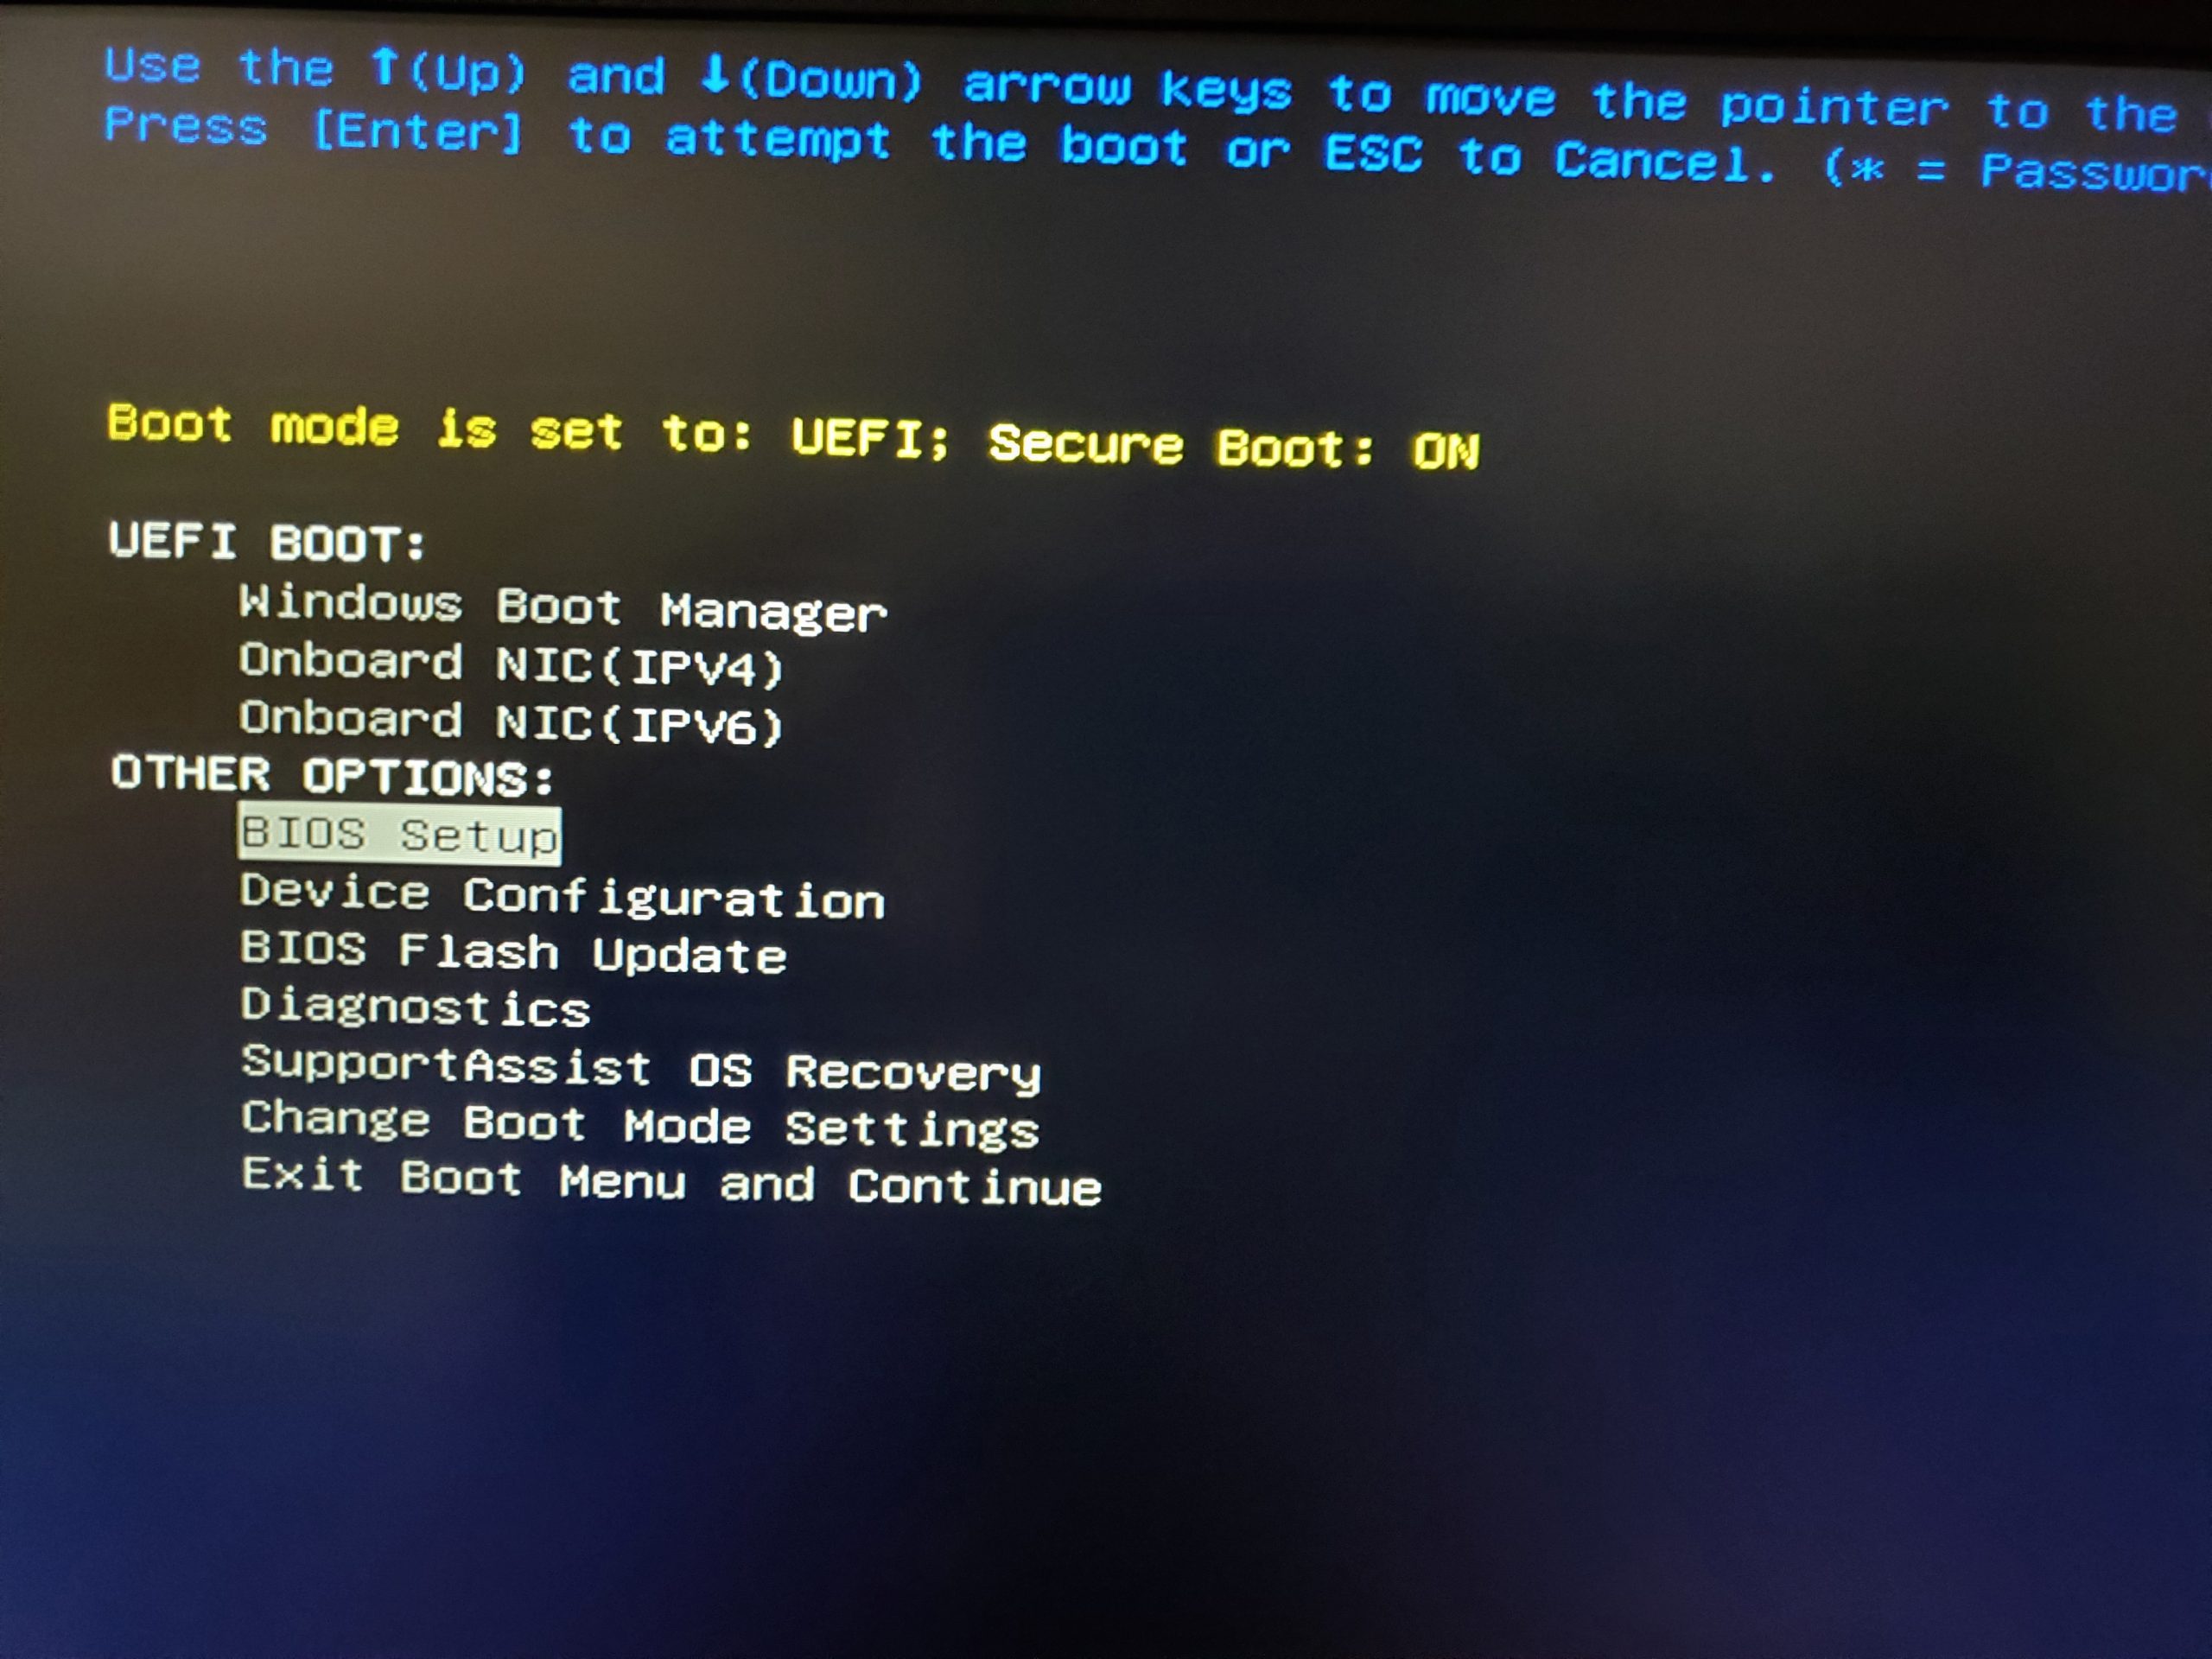
Once again, spam F12 on startup to get the BIOS screen. This time, select BIOS Setup.
Now a screen like below should pop up. Hit the plus sign next to “Maintenance” and then click Data Wipe. Now on the right side, check the box that says Wipe on Next Boot. You should get a popup like below where you have to click OK. Then click Apply, then Exit and the computer should automatically reboot and start wiping the data. Click “Continue” then “ERASE” when the computer prompts you. If done successfully, the screen should turn green and say “Data Wipe Completed Successfully”. This is a safe way to wipe for an SSD.
Don’t forget to double check that the device has been marked as surplussed in HelpDesk before putting it in the surplus pile.
Dell Data Wipe (Newer Version)
The Data Wipe feature is invoked from within BIOS Setup. At the Dell splash screen, press F2 to enter BIOS Setup.
2. Once in the BIOS Setup application, the user can select “Wipe on Next Boot” from the Security > Data Wipeoption or Advanced > Maintenance to invoke data wipe for all internal drives after the reboot. The BIOS asks for user confirmation twice before allowing the user to exit setup with the “Wipe on Next Boot” option selected to ensure that the user intends to erase all storage devices.
3. As an added safety measure, the BIOS adjusts the default selection for the final prompt to further enforce direct user acceptance of this operation.
4. Once the option is successfully selected and the prompts have been confirmed, the user exits BIOS Setup to force a reboot of the system and begin the data wipe process. After the reboot, the BIOS once again prompts for several confirmations before sending the data wipe instructions to the customer storage devices.
5. The user can select to cancel the drive wipe procedure at either of these prompts, and the data wipe trigger is reset. The process must be reinitiated from BIOS Setup to restart the erasing procedure, if wanted.
6. A successful erase procedure is reported by a green dialog and the “Data Wipe Completed Successfully” message. If there are any failures, they are presented instead of the success dialog: “Reboot the system and reinstall the OS”.
Nuking an Older Mac (pre-2022)
The easiest way to nuke a Mac is to shut down the device, then click the power button and hold down Command+R (the command key and the R key) if it is an older Mac (You then have to wait till it boots up but you should eventually see something like this):
Go to “Recovery Assistant” in the top left menu, click “Erase Mac” at the bottom. There will be 2 more options to click “Erase Mac”. Choose it each time.
Or it may look like this:
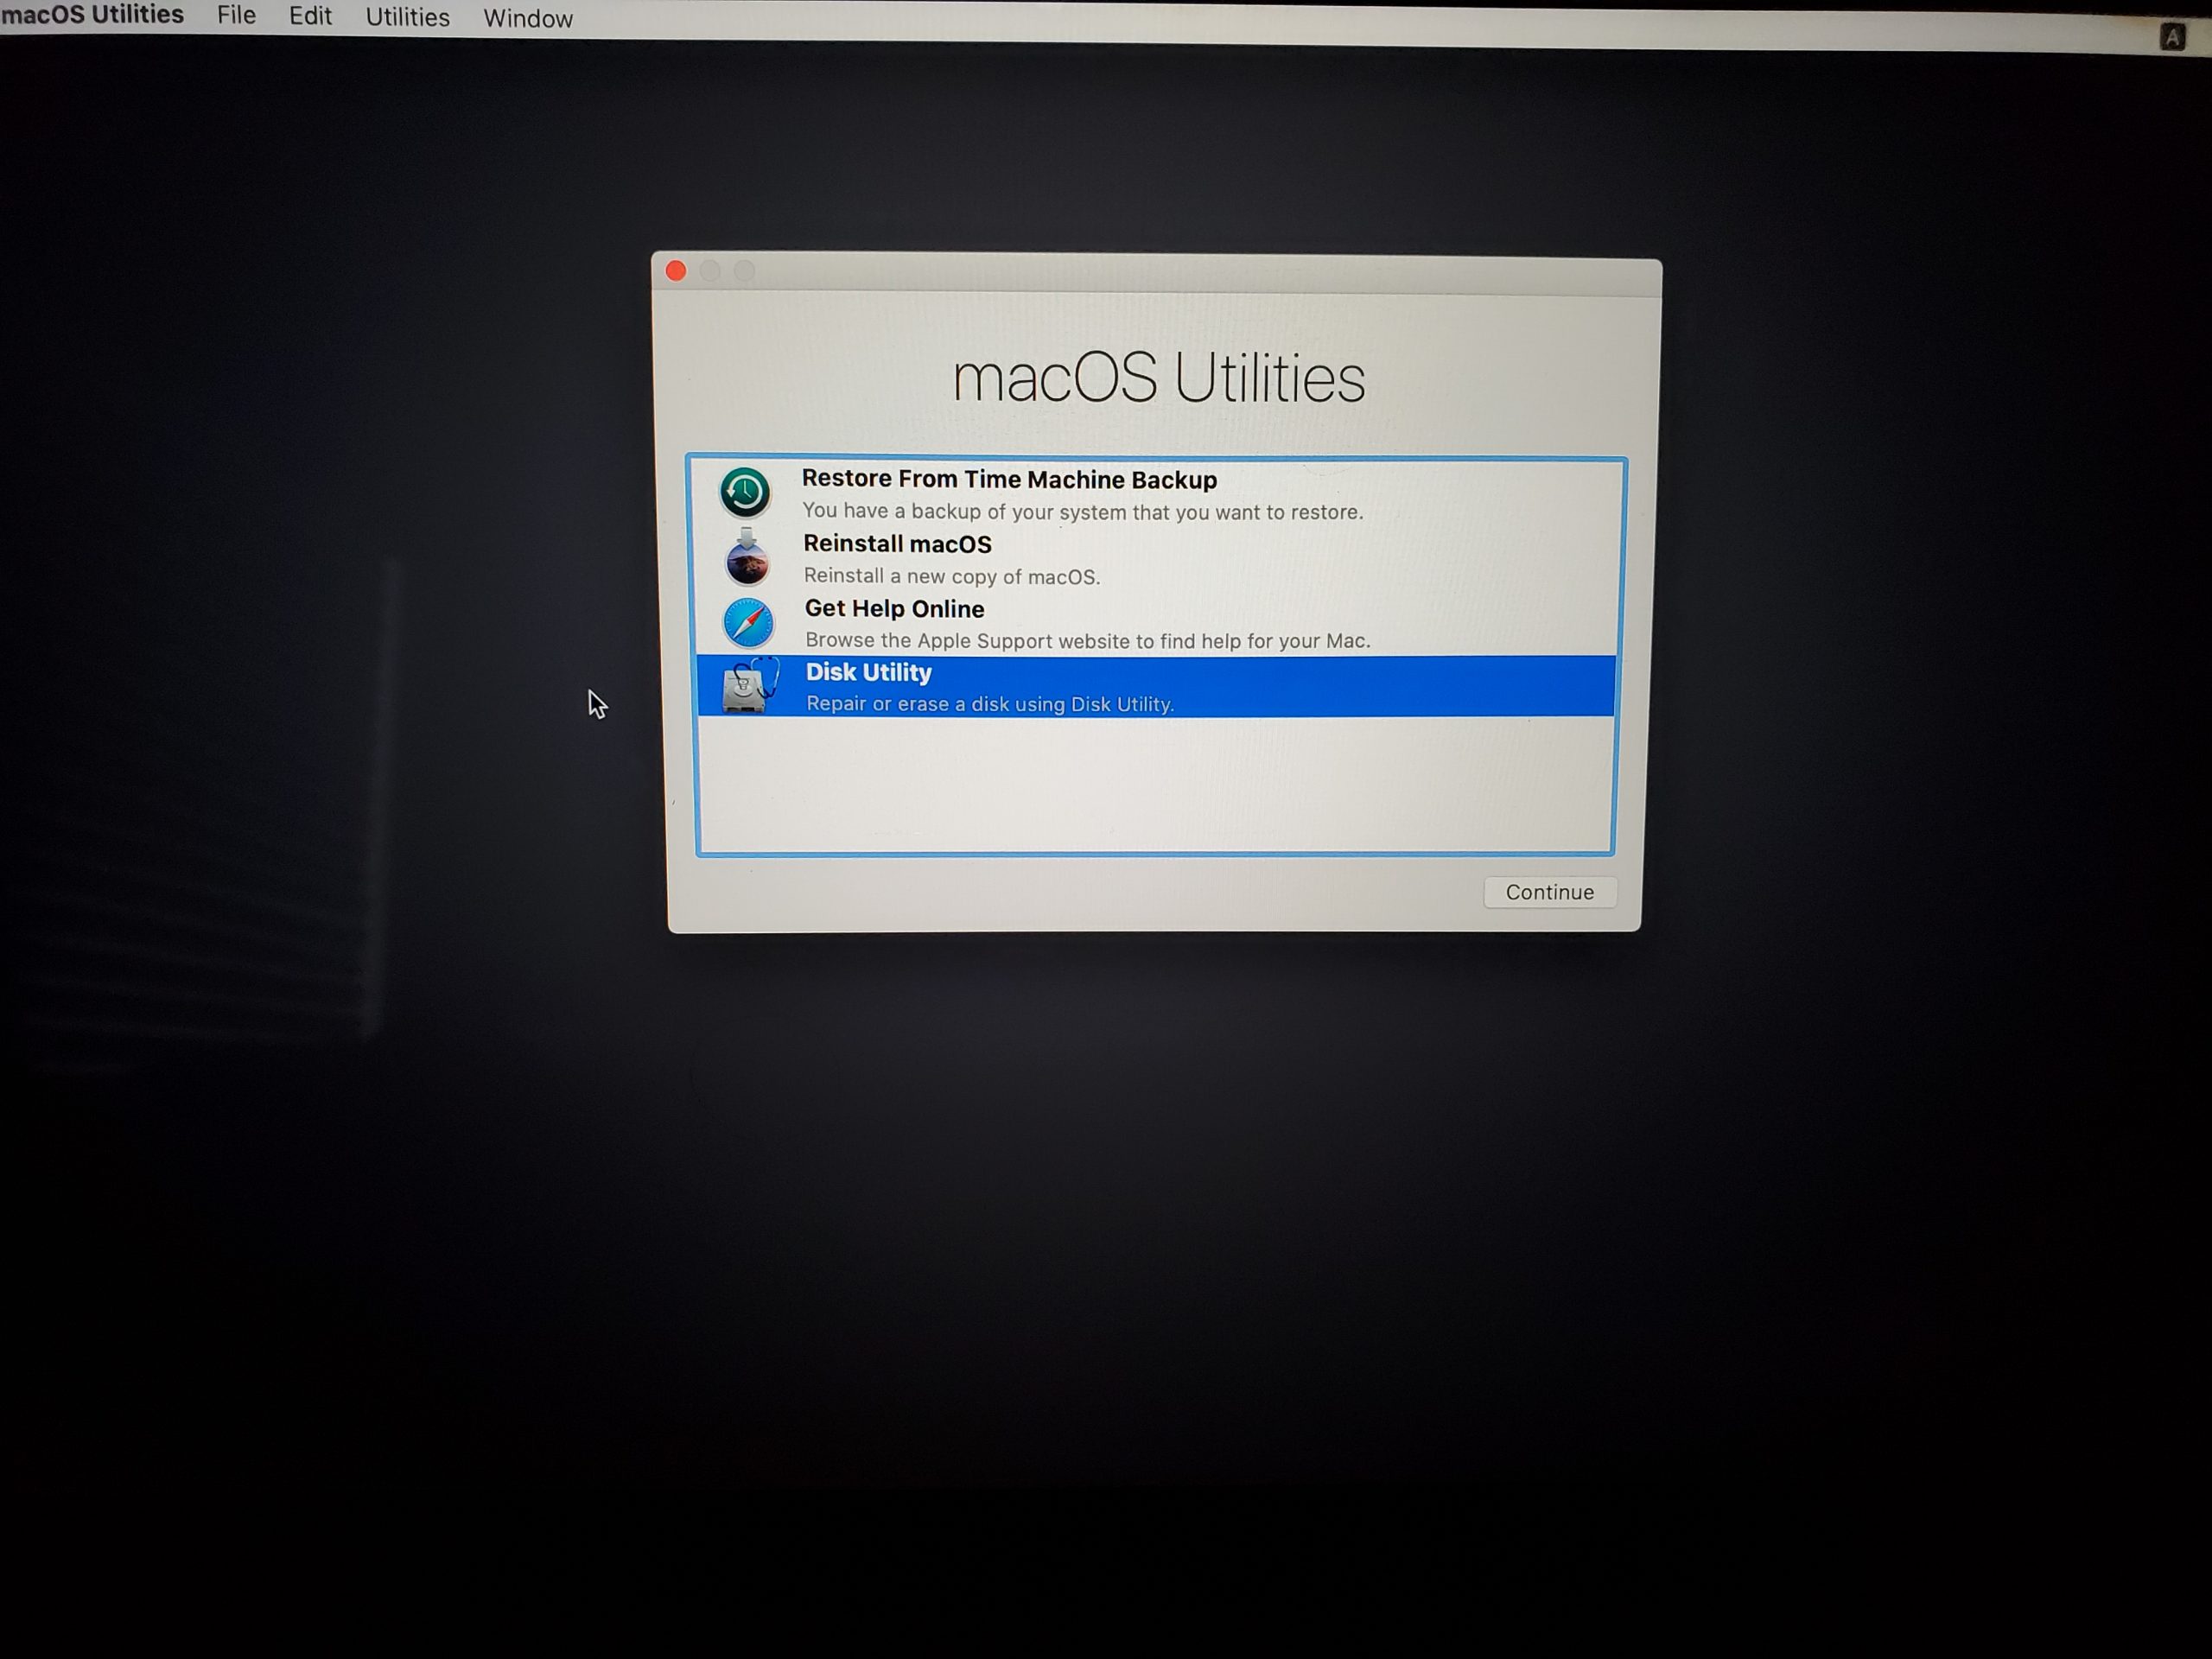
Go ahead and hit Enter. The next screen looks like this:
Double click Disk Utility to open the Disk Utility:
Select the storage device you want to nuke on the left-hand panel (you should wipe all of them one by one if you want a clean nuke) and then click “erase” in the top panel. The drop down box should appear as shown above. If the Mac has SSD storage, it will look exactly as above and all you need to do is click erase. If its an older Mac with a hard drive, you will see a Security Options drop down menu in between the Format box and the Erase button. You will need to choose 3 passes. The SSD way takes seconds, the hard drive way takes hours.
If you want to confirm that the Mac has been nuked properly, then restart the Mac and ensure that a question mark shows up on the screen.
Nuking a Newer Mac (post-2022)
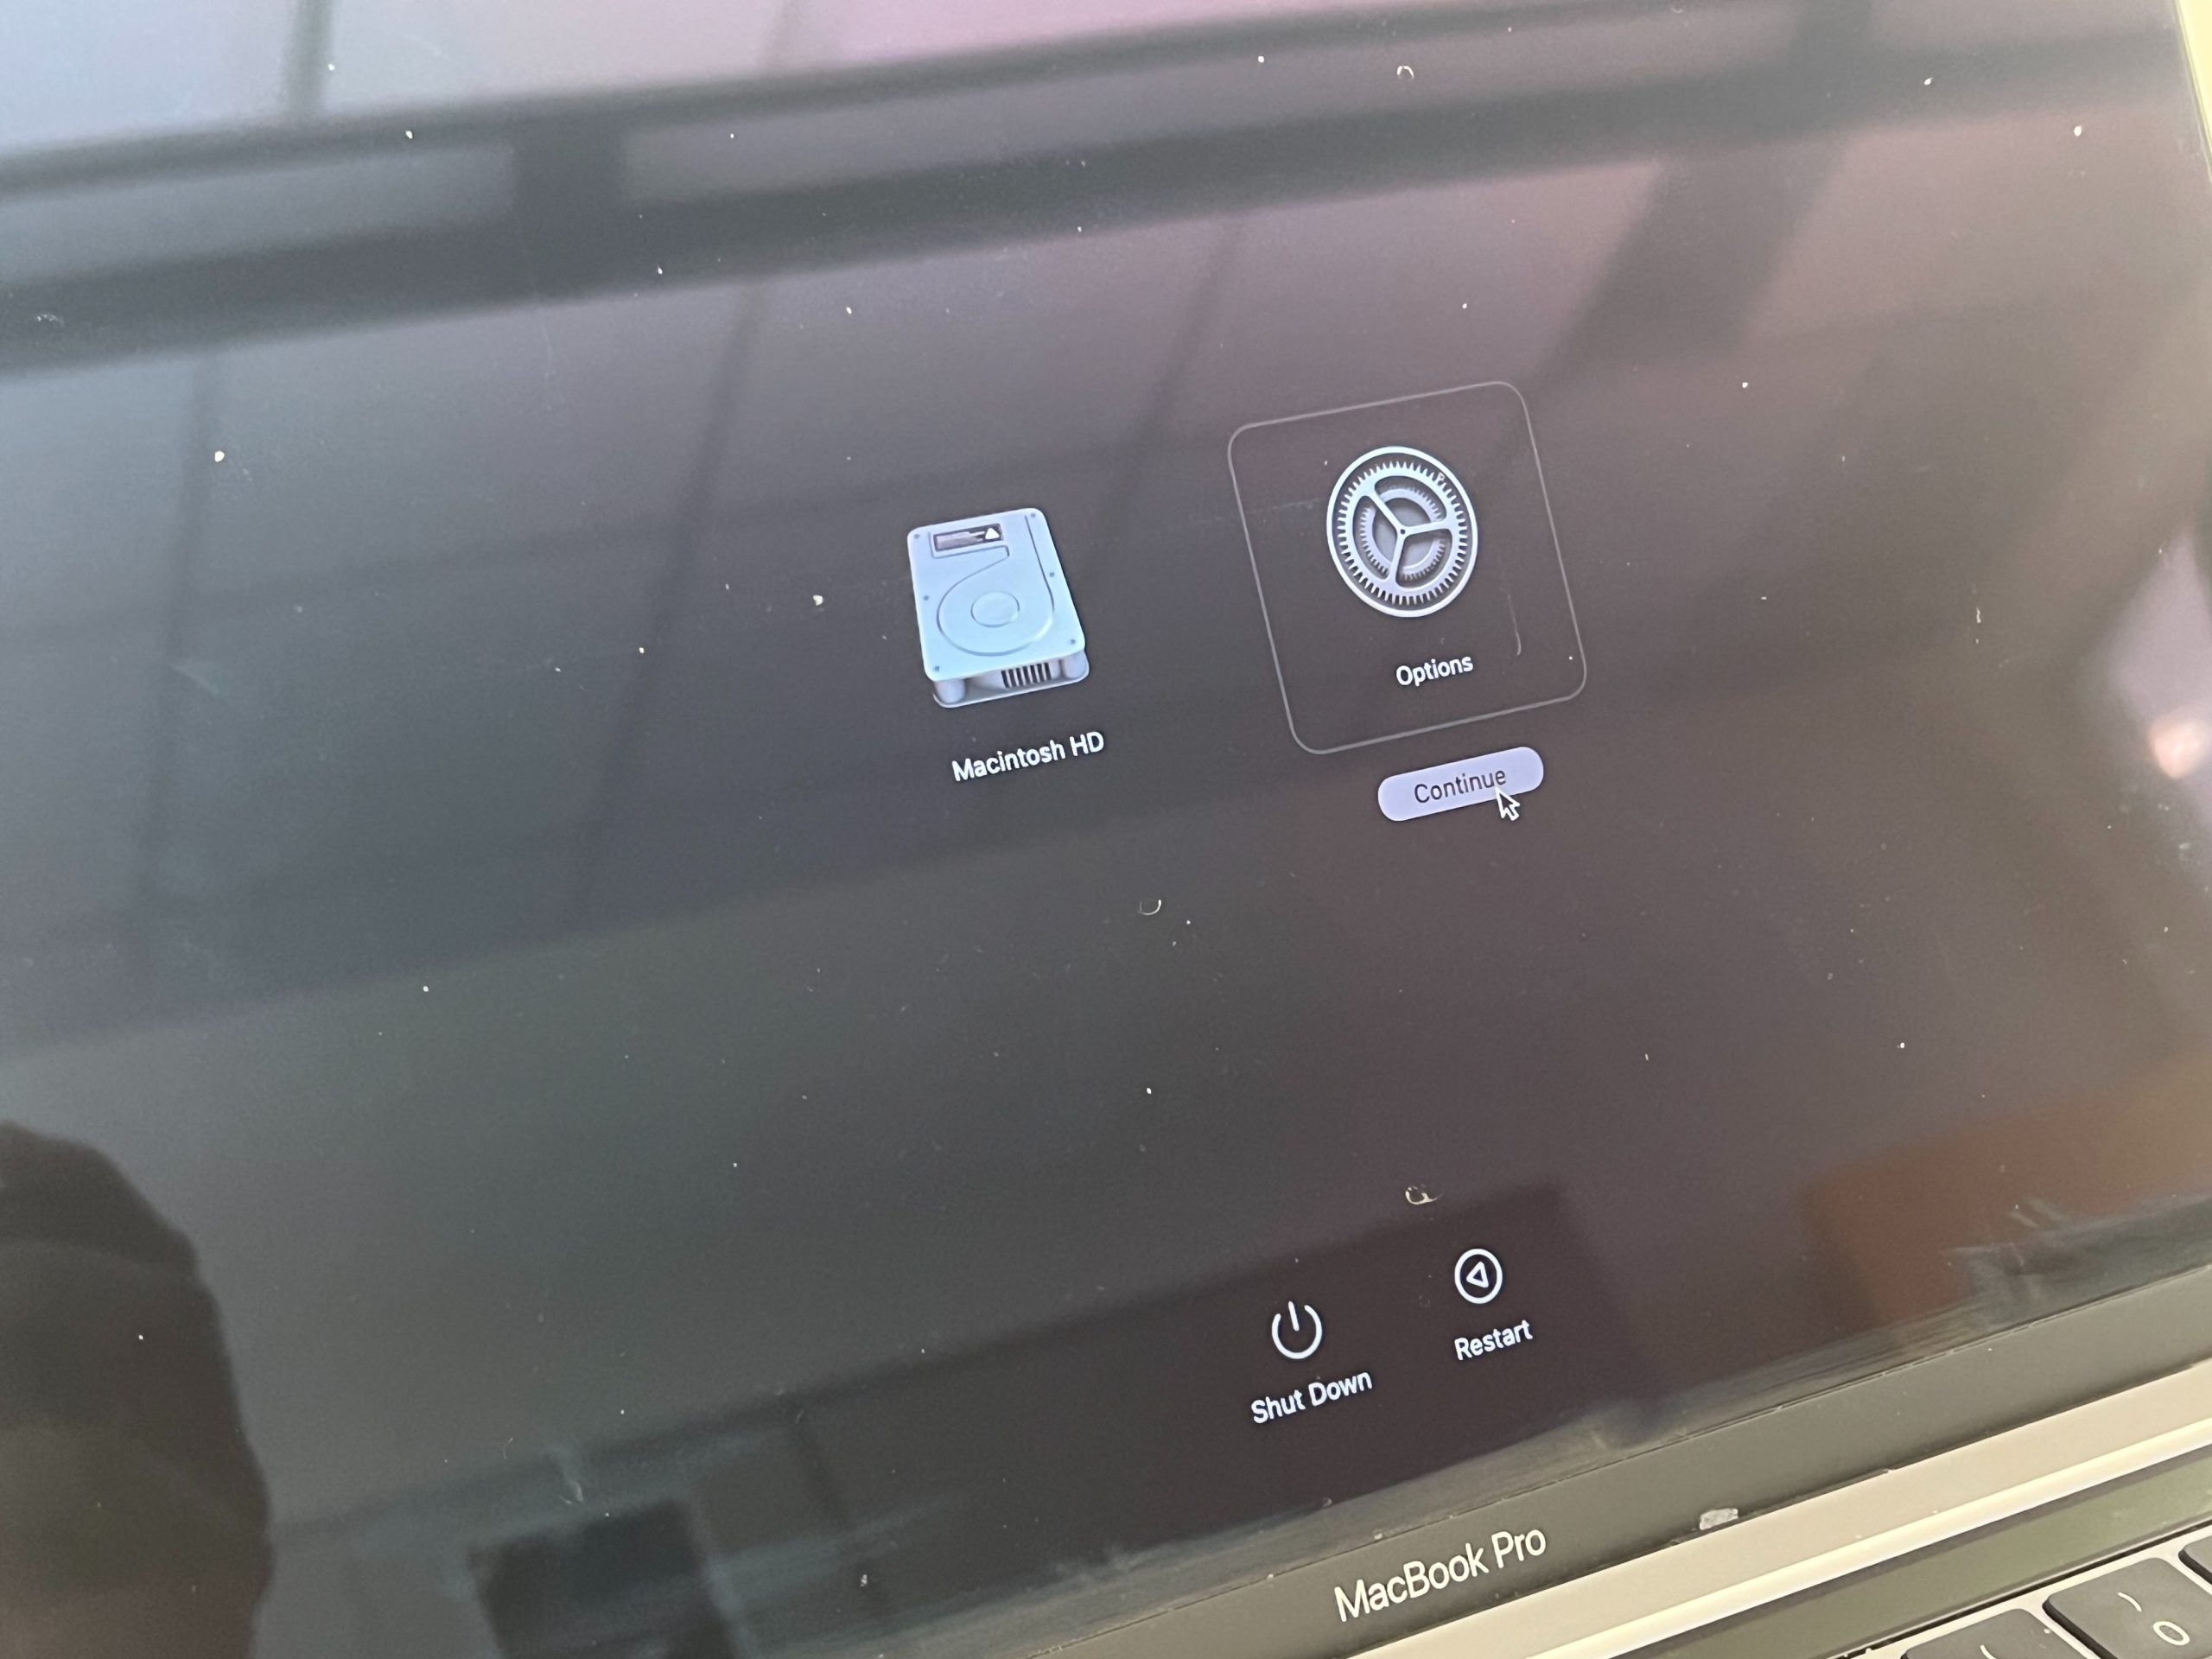
The easiest way to nuke a Mac is to shut down the device, then click and hold the power button until the menu comes up that looks like this:
On the menu, choose “Options”. Then, choose the “humsupport” account. Then type in the humsupport password if needed. Next, a screen will pop up that looks like this:
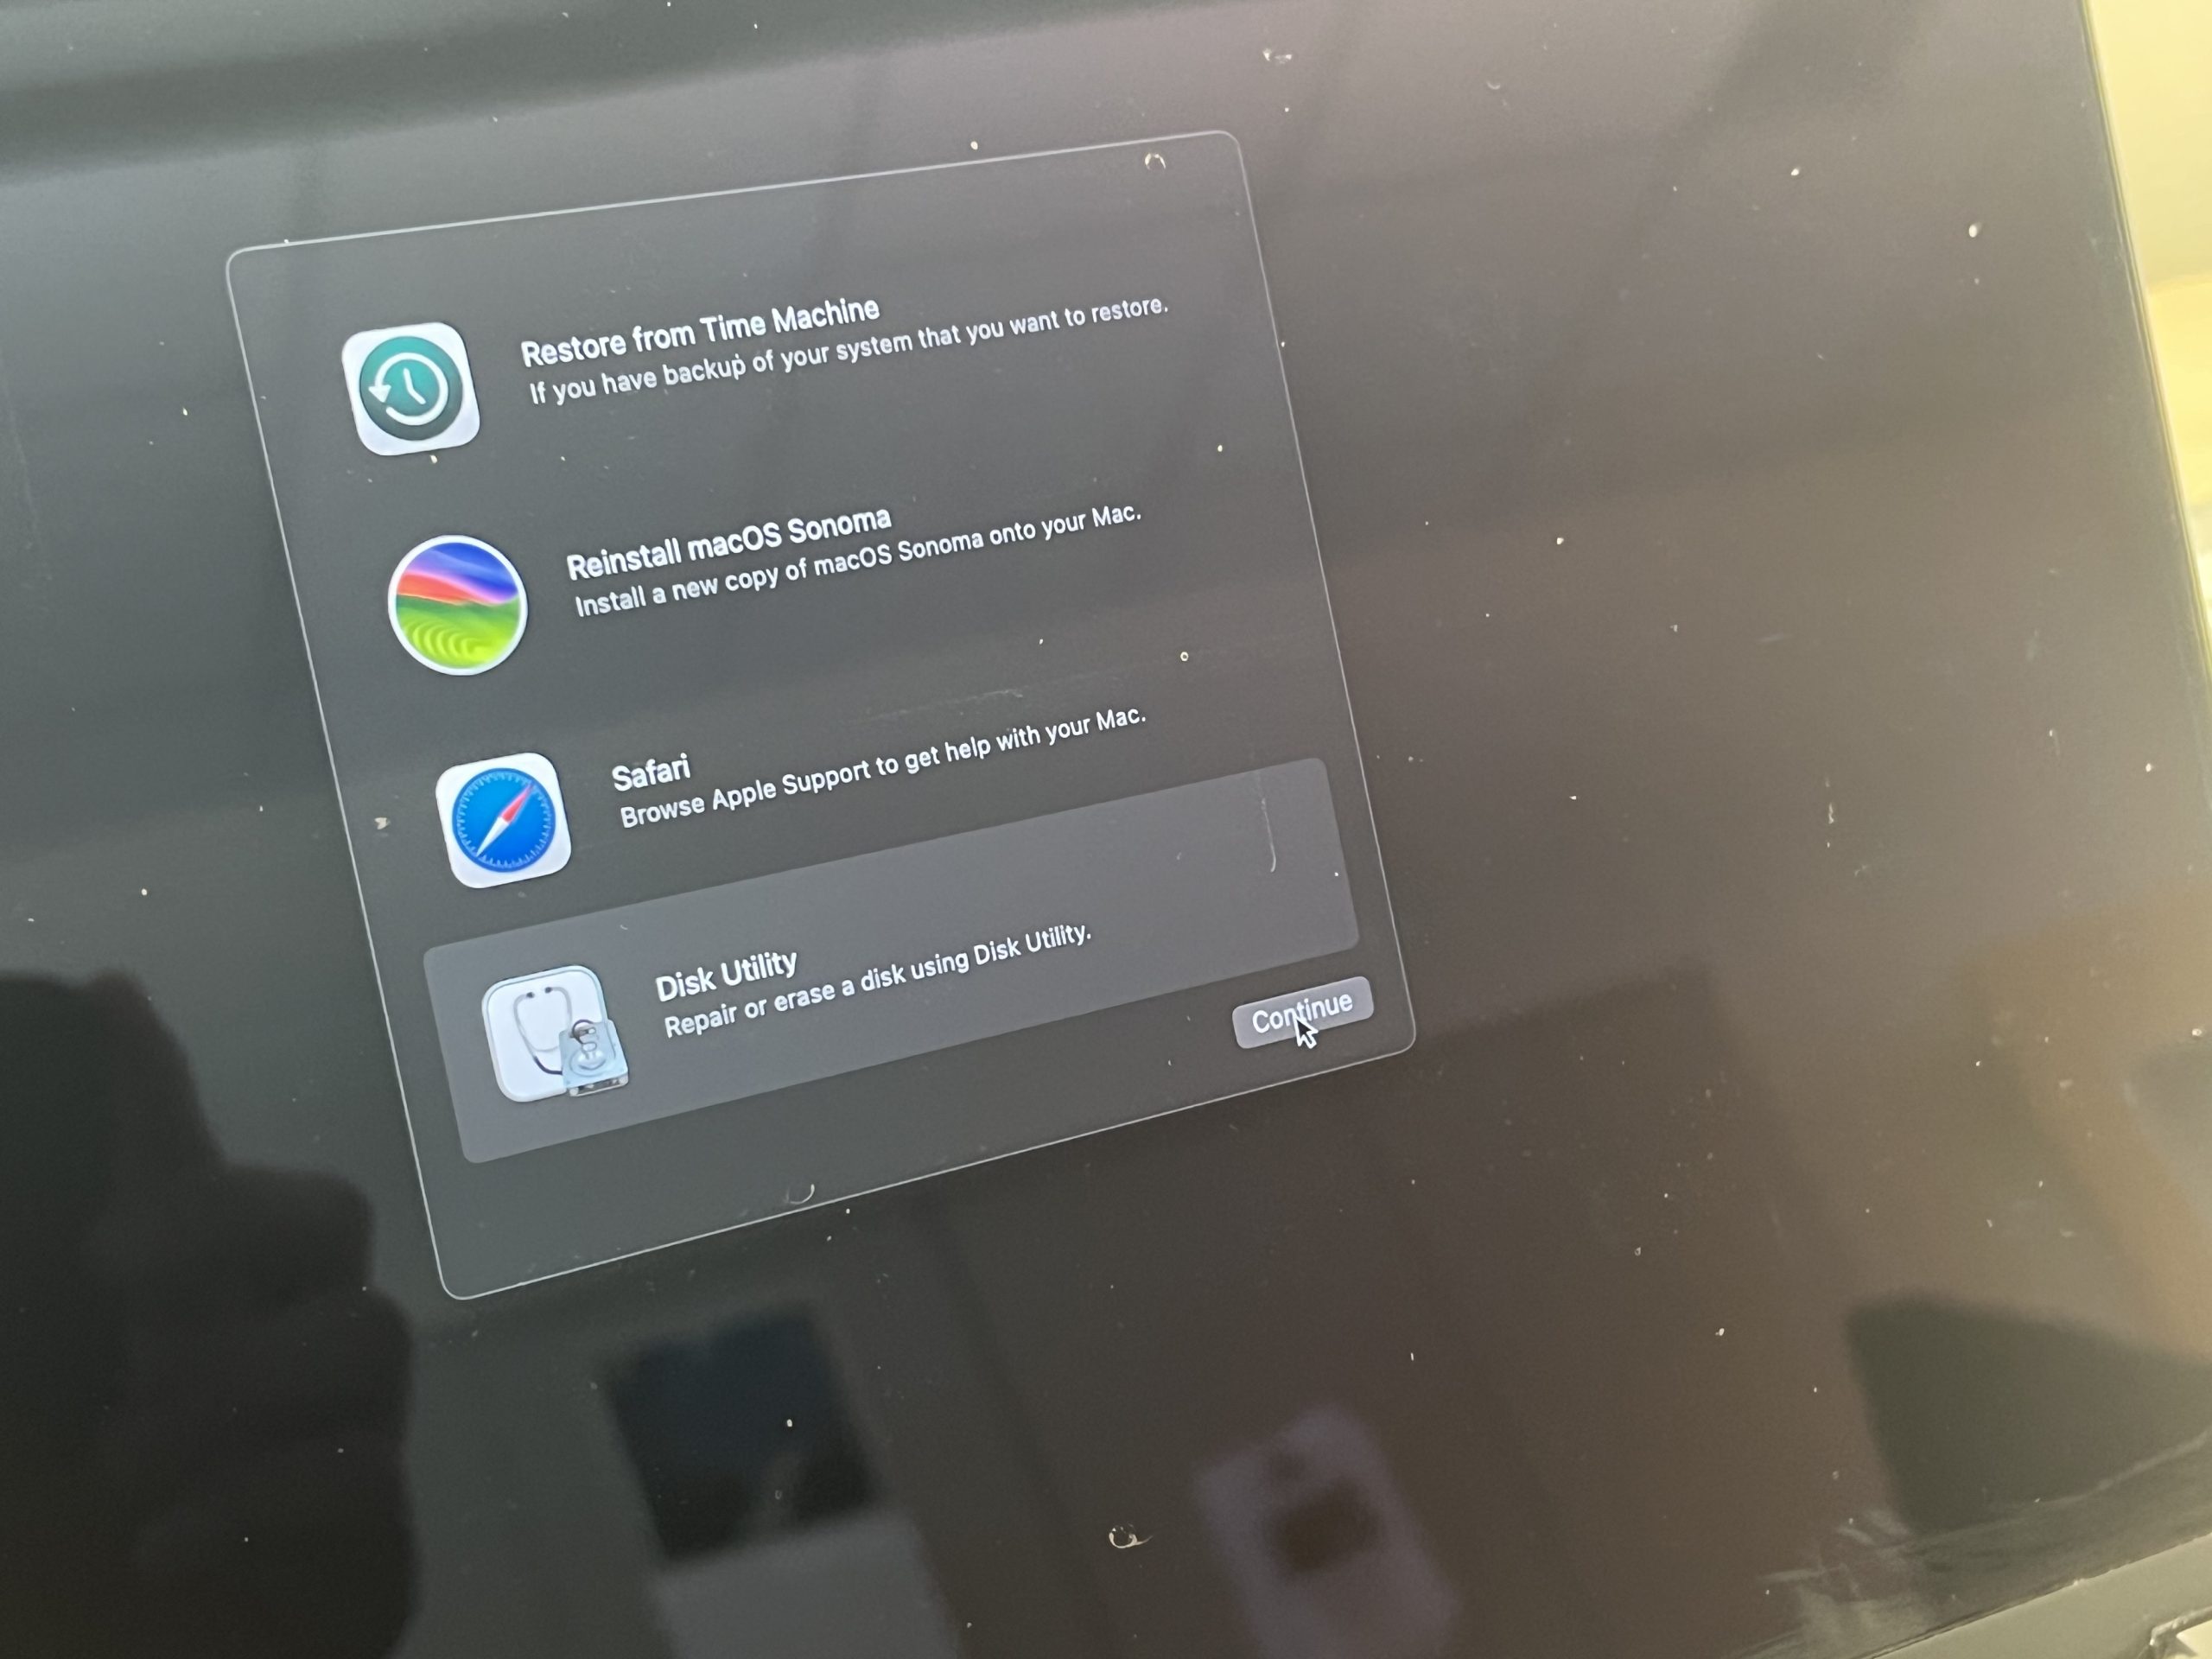
You will want to select “Disk Utility” and then continue. Then, the screen will look like this:
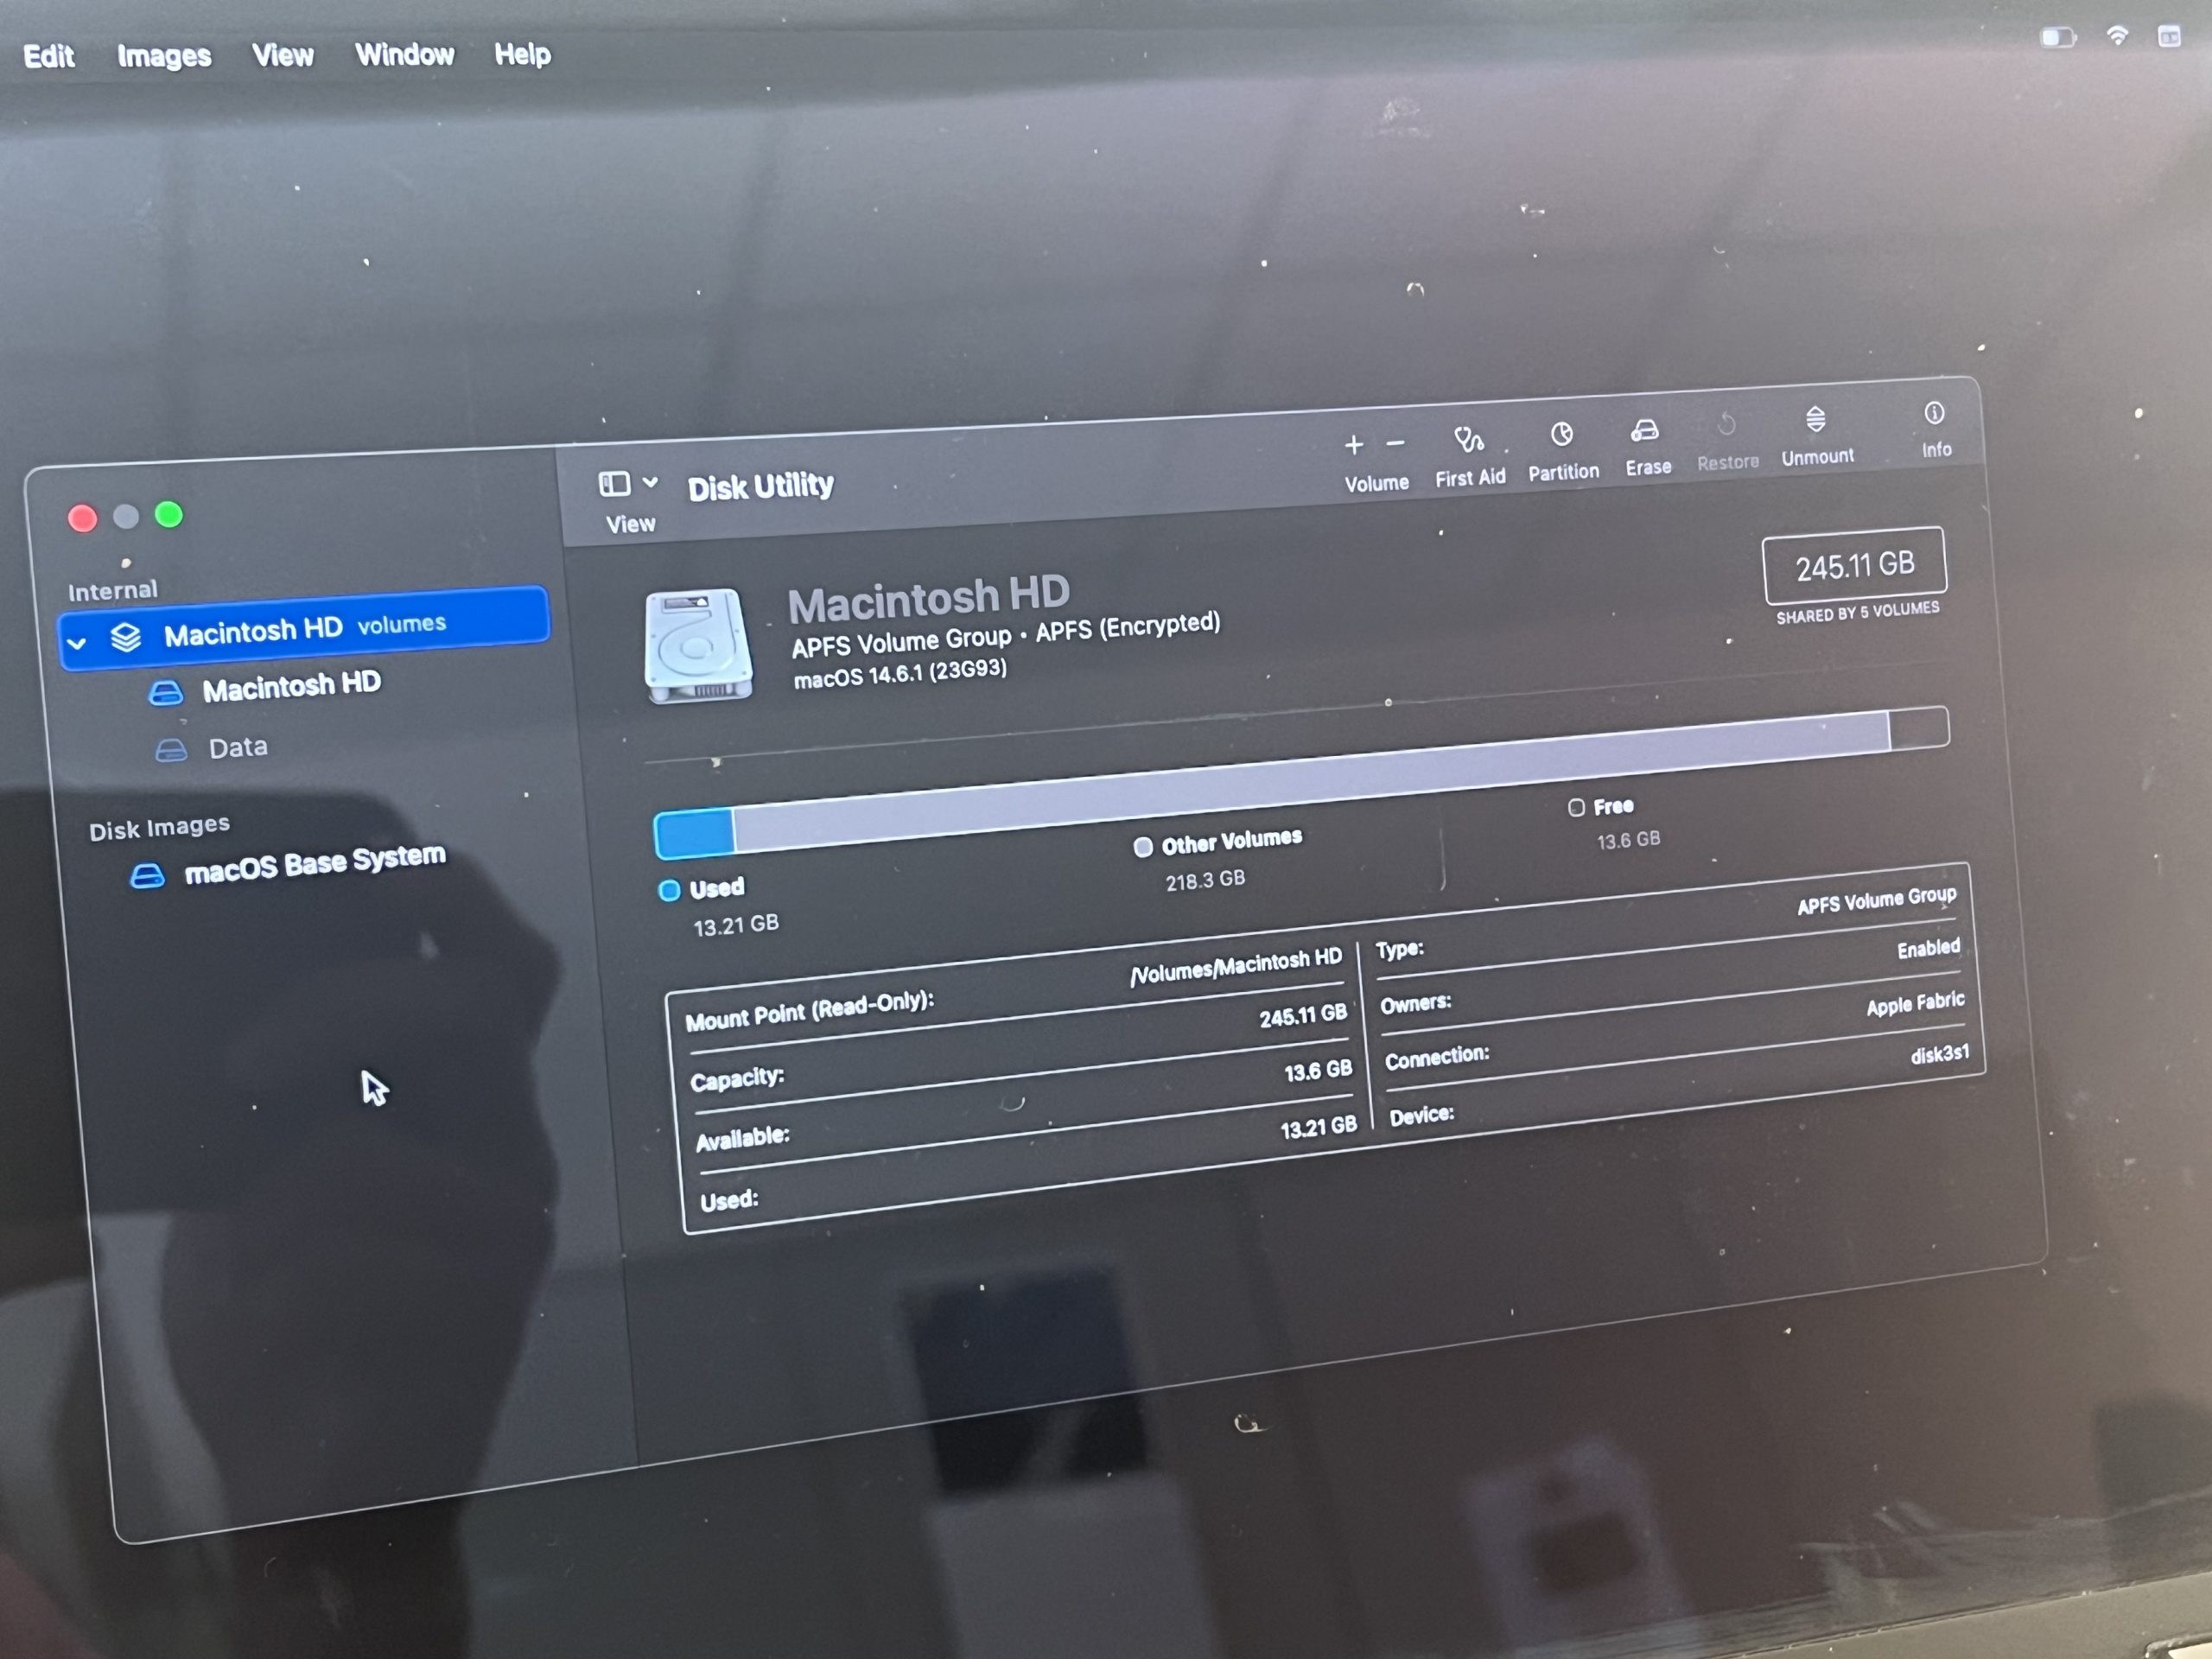
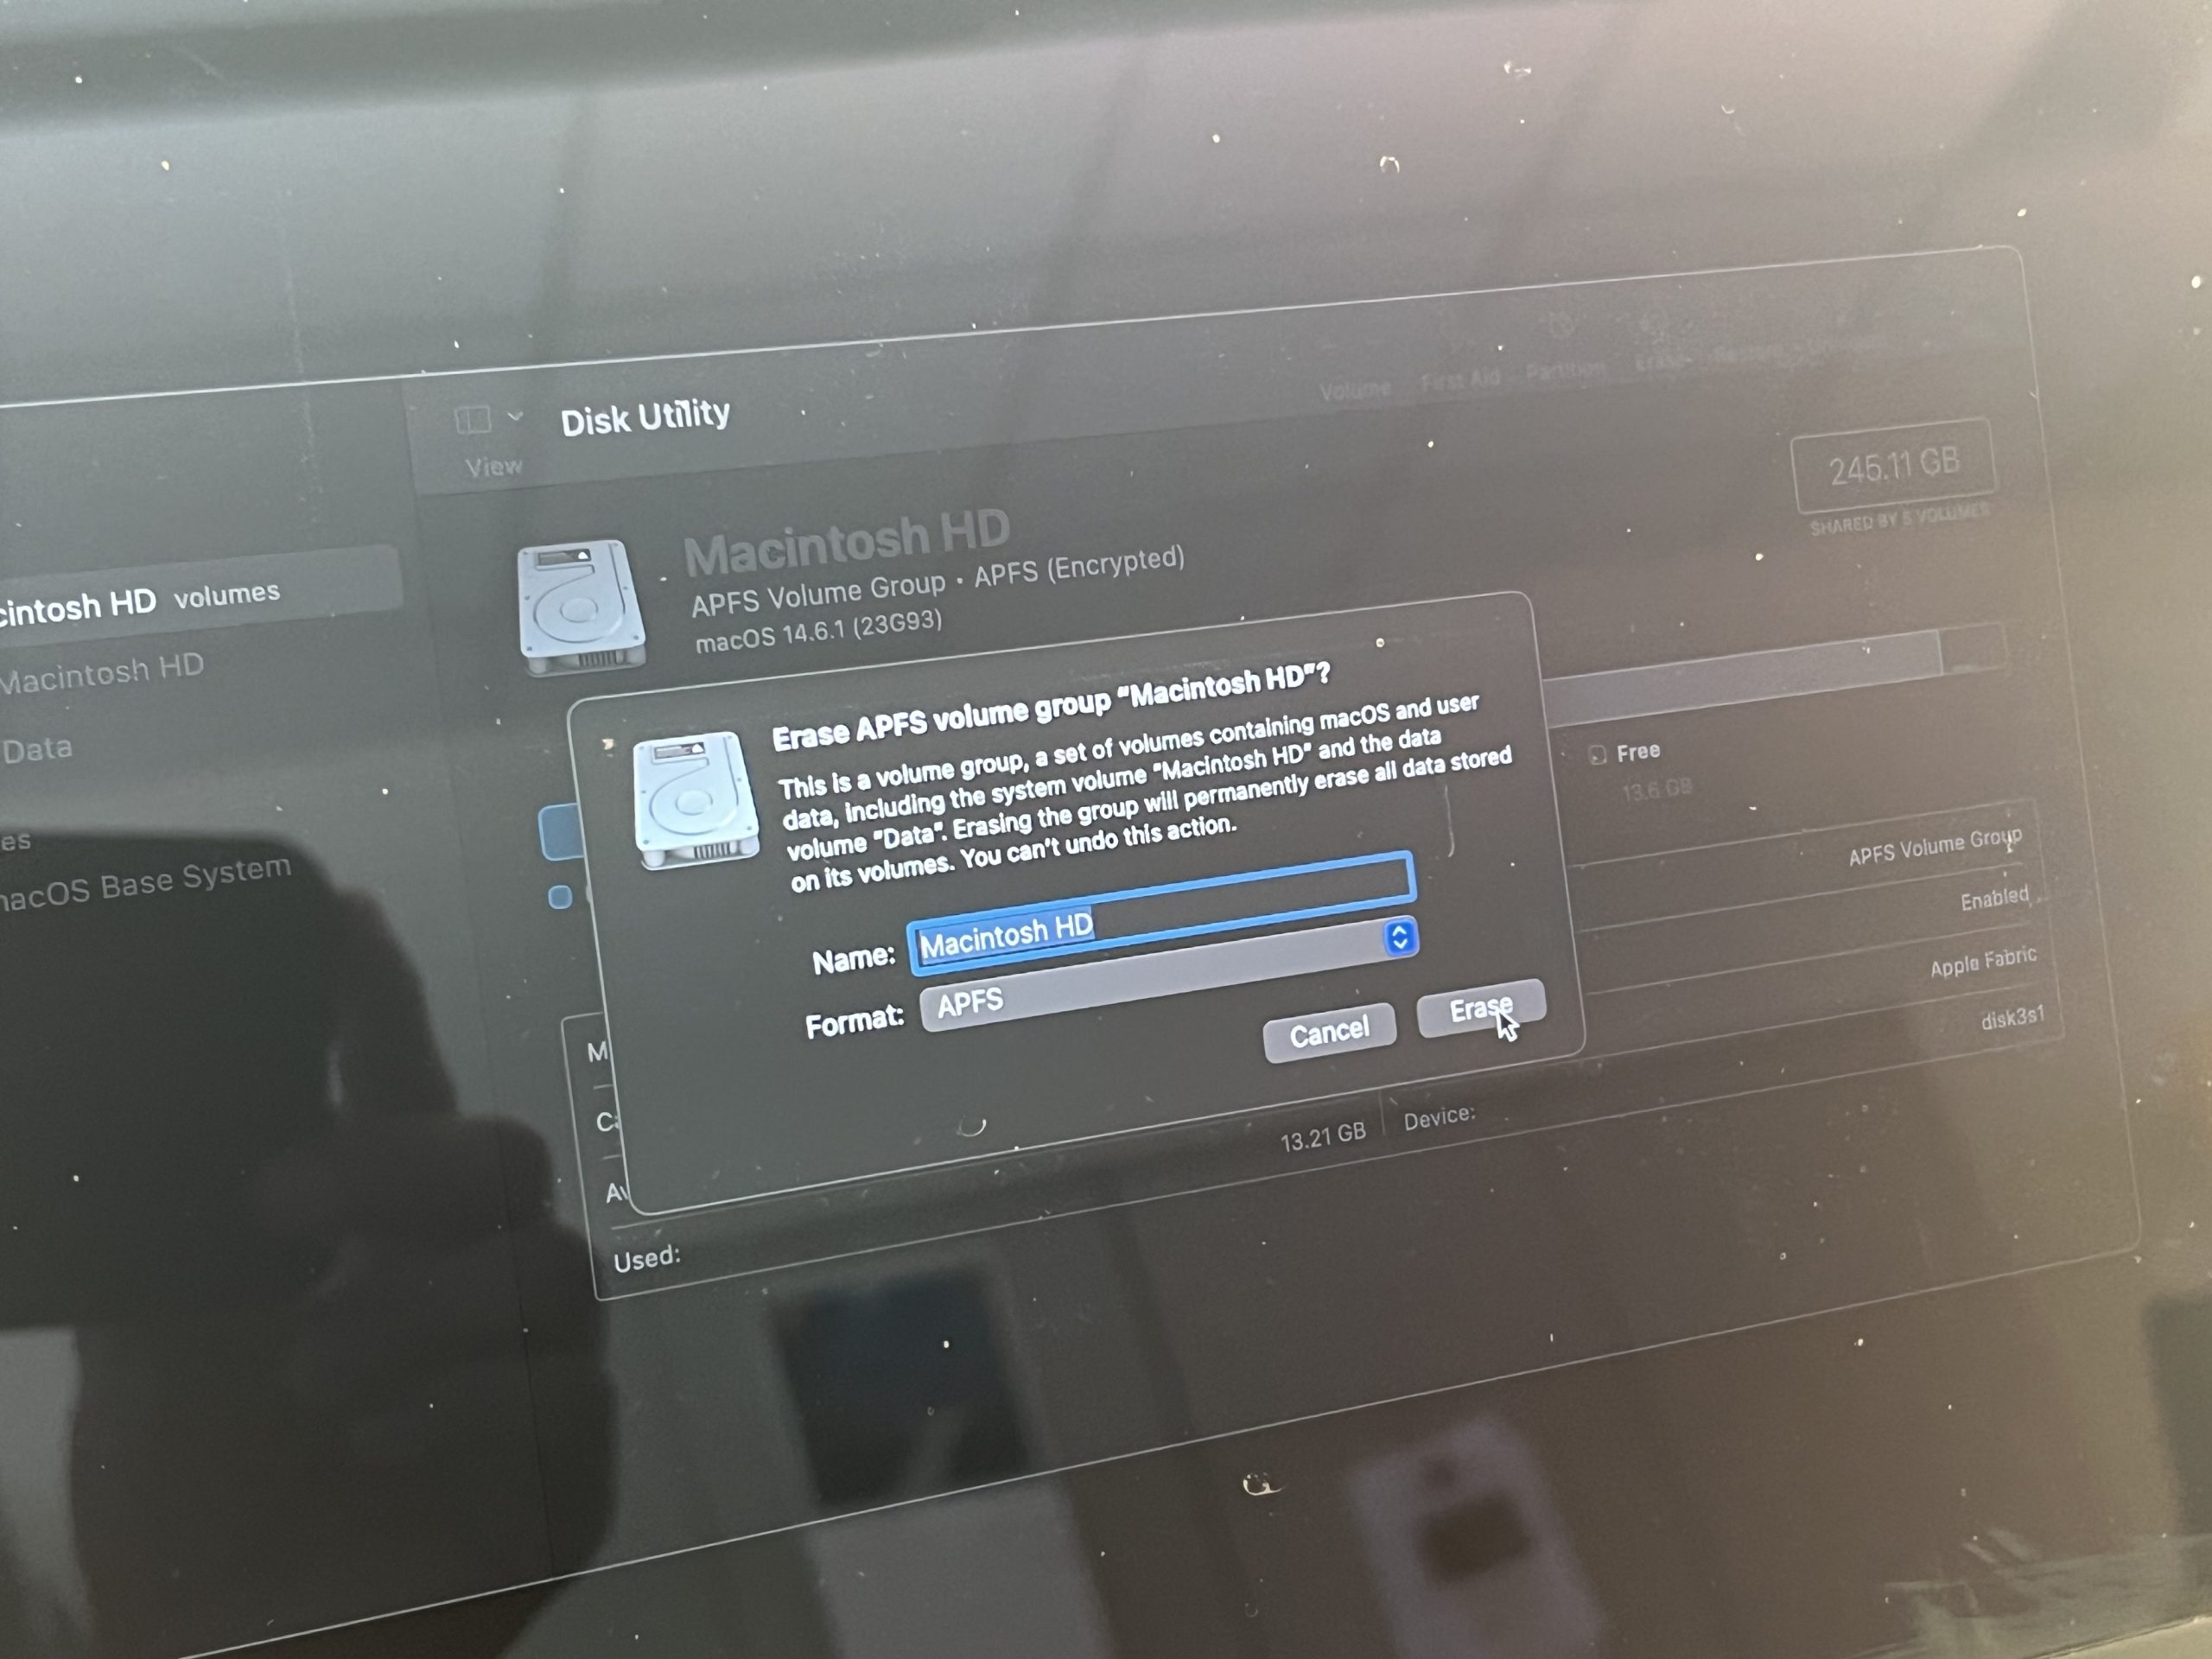
Select “Macintosh HD”, and then you will hit “Erase” in the top right corner. The next screen will look like this:
Hit “Erase”, then “Erase Mac”. You will then need to hit “Erase Mac and Restart”.
Marking as Surplus
Don’t forget to double check that the device has been marked as surplussed in HumHelp and listed on the surplus spreadsheet before putting it in the surplus pile.
To mark as surplus in HumHelp, click on “Today” next to “Surplus Date”. Then, hit “Save” in the bottom left corner. This device should now be marked as surplussed!
If you try to start up a Mac that has been nuked, all that happens is a File Folder with a question mark will blink on the screen for about 5 minutes and then the machine turns off. In order to get the Mac back working, shut it down, and click the power button and hold down Command+Option+R. This will boot the Mac into internet recovery mode.
This time double click the Reinstall macOS option. It will take you through a self explanatory walk through of installing the latest (or the newest that can be installed on your mac) macOS. After you have reinstalled the OS, follow the Mac imaging process as usual (https://humcsr.byu.edu/2018/08/10/setting-up-a-new-mac-computer/).
Posted inGeneral, Imaging, Mac|Comments Off on How to Nuke a Computer
Setting up a shared account. The following instructions have Office 365 installed. There are a couple items that need to be determined and set up before this can happen.
Does the department secretary share a calendar with the student secretaries? This is known to be the case in the Center for Languige Studies, Comparitive Arts and Letters, Linguistics, and Spanish & Portugeese. If not, proceed to the second item. If so, the student needs a new email account created for them, this is usually their first name followed by four numbers, i.e. brad1234@byu.edu. The email creation can either be done by the CSR or the department secretary.
If this new account needs to be set up two emails will be installed. First set up this account in Outlook following the instructions given in Email Setup in Outlook, then follow the instructions below to set up the shared account.
The shared calender invite is sent to the new email address that is created and not through the shared email address.
To access a shared email account, access needs to be granted through a Gro Group. This can be done by the CSR at gro.byu.edu. It may take an hour to a day before the student will have access.
If the student prefers working through a browser they can skip the following steps and go to the link outlook.office.com/owa/department_email@byu.edu. Replacing “department_email” with the email address they will be accessing. After opening the link on the web browser they will be prompted to sign in with a NetID and password and Duo authentication.
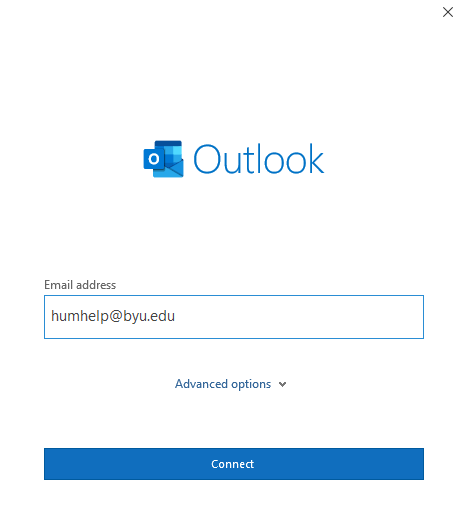
In Outlook enter the email address they would like to connect to, i.e. the department email address.
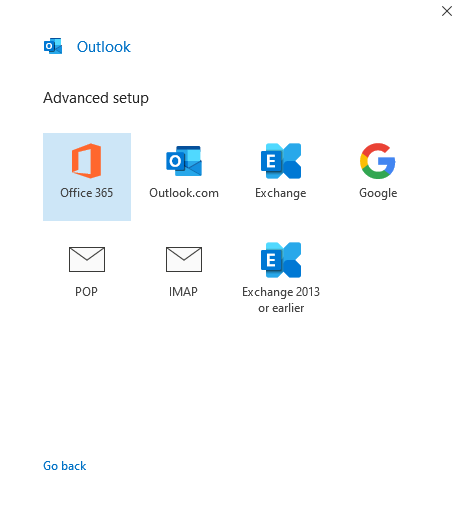
Select either Office 365 or Exchange.
Don’t type in a password! Select “Sign on with an other account”.
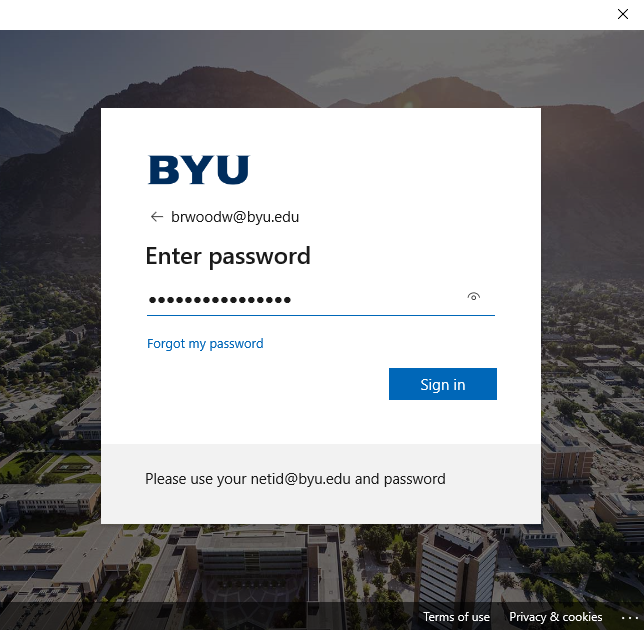
Have them enter their password and then DUO authentication.
You will be taken back to the original screen where you are asked for a password. Don’t type in a password! Don’t worry you are making progress. Click on “Sign in with an other account” again.
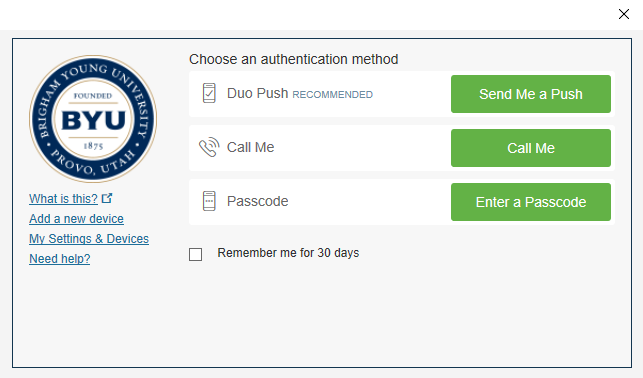
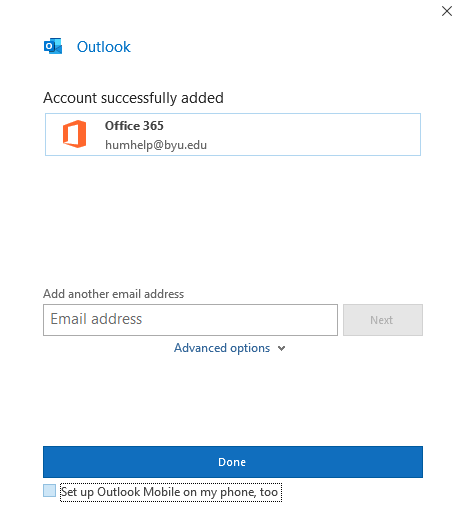
This time it will have a button with their NetID that you can push.
Click done.
If the department secretary shares a calendar with the group this can be done by having the department secretary share the calendar with the new email address that was created for the student, i.e. brad1234@byu.edu. Check for the email on the students account and accept the invite.
For faculty and full-time staff email set up is pretty straight-forward. The following instructions have Office 365 installed.
When Outlook asks for an email address have them enter their NetID@byu.edu.
Select either Office 365 or Exchange.
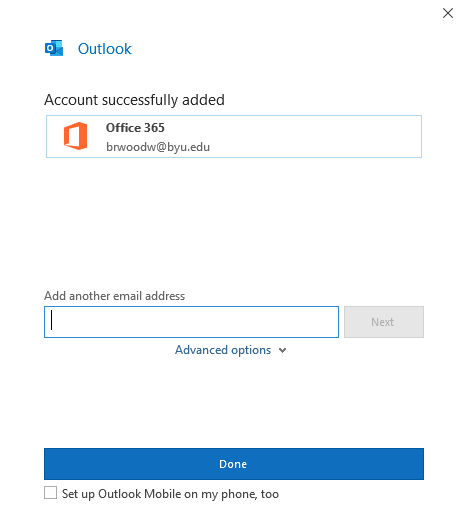
If they signed into their computer with their NetID it will skip the account verification and will prompt for DUO authentication.
Unless there is a second account to set up, click done. If there is a shared account that they will also need access to follow the steps given in Shared Email Setup in Outlook.
BYU Cloud Apps allow all students, faculty, and staff to access BYU-licensed applications running on remote servers in our datacenter for coursework and business needs. These applications can be accessed and used on any device or Operating System, including Windows, MacOS, Linux, iOS, Android and Chrome OS. Access to cloud storage, such as Box, Google Drive, Dropbox, and OneDrive is also available in this environment to enable personal data storage.
Cloud Apps functions by opening a “session” with a Citrix server. A session is essentially a connection with the user’s computer and the server. The user’s computer shows the application and the work being done; however, the actual instance of the application and work within it is being done on the server.
Internet access is required to access these applications.
Access BYU Cloud Apps
All BYU students, faculty, and staff that want to access an application using Cloud Apps can do so in two ways:
Note: Data will not save in the applications unless correctly setup. See saving data in Cloud Apps
1. (Preferred Method) Access through the web browser
Note: This method does not function on mobile devices
2. Install the desktop program
Download the and install the Citrix Workspace app from https://www.citrix.com/downloads/workspace-app/ (Do Not Enable Single Sign-on: if enabled you will have to uninstall then reinstall workspace to fix the issue it causes of needing to be tied to the domain)
Alternatively: Install Citrix Workspace from Self Service on Macs / Software Center on Windows.
Note: This method is best for mobile devices, those needing to access local hardware, or those who wish to display Cloud Apps in a separate window.
Saving and Accessing Data in BYU Cloud Apps
A user cannot store their files or data on the server. This is because everyone who uses Cloud Apps accesses the same set of servers. If saving on the servers were allowed, servers’ storage limit would be reached quickly. Users can save their data to cloud storage locations such as Box using a service called Kumo to link users to their cloud storage. Cloud storage is (are) a place(s) where users can store their files or data that is not on their personal computer. A common example is Box. The documents in Box are stored in Box’s storage and accessible from anywhere with an internet connection. Once a user has set up their cloud storage in Kumo, they can save or open any files from Box, Google Drive, OneDrive, and Dropbox in any Citrix Application.
Expand and authorize the cloud storage providers you would like to have access within Citrix
Note: A green check denotes that you have authorized this cloud storage.
Access Cloud Storage:
Once a user has authorized cloud storage they can open or save files in their authorized cloud storage, in any application.
Note: The process of opening and saving files will vary slightly depending on the application. In general, most cloud storage locations such as Box can be found by navigating the file explorer to find the cloud storage.
FOR PART TIME EMPLOYEES AND LABS, SEE BELOW BEFORE FOLLOWING THESE INSTRUCTIONS
Adobe Creative Cloud can be found in Software Center (for Windows) and Self Service (for Macs). Search for Adobe CC Desktop and hit Install. This might take a few minutes.
Note: If Software Center/Self Service isn’t working, the downloads for Windows and Mac can be found at adobe.byu.edu.
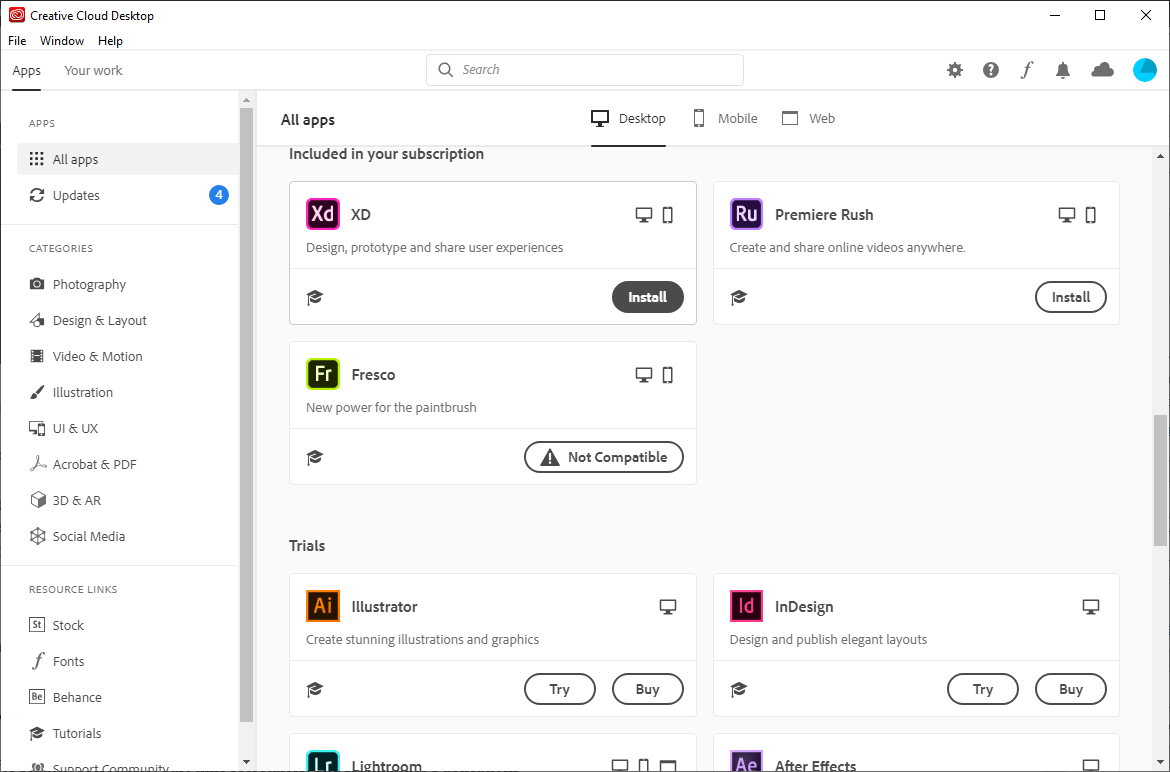
Once Adobe CC is installed, running the program Adobe Creative Cloud (or just Creative Cloud on Macs) from the Start Menu or Applications folder will bring up this window (or similar):
Full-time BYU employees (faculty and staff) should already have access to the Adobe Creative Cloud suite of software. They can just sign in with NetID@byu.edu and password (will redirect to a BYU-branded login and Duo 2FA security screen).
Once they’ve signed in and passed Duo, individual CC Suite software can be installed on an as-needed basis (Photoshop, InDesign, Illustrator, Premiere, etc). Simply press Install under the Program and wait.
Note: if installation fails, close all other running programs. If it still fails, restart the computer.
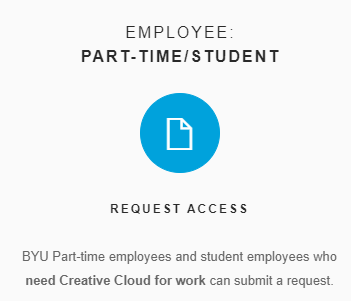
FOR STUDENT EMPLOYEES/PART-TIME FACULTY & STAFF:
This is mostly for student secretaries, part time secretaries, and Humanities Publications students. Occasionally a TA helping a professor with a project.
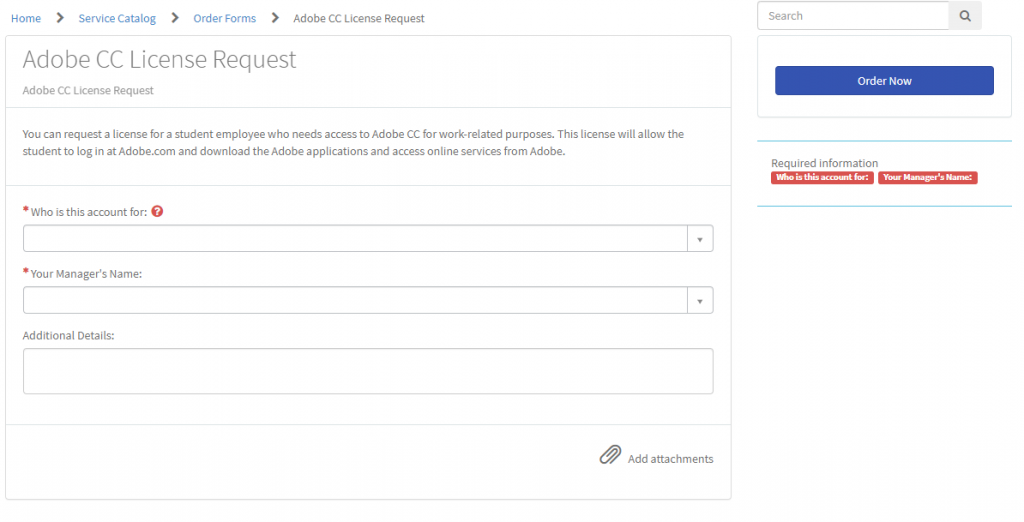
At adobe.byu.edu, hit the “Request Access” button. This will lead to an OIT form where the user will need to fill in the required information then hit “Order Now”.
This might take a while to be approved. Once access is granted, follow the normal procedures above.
FOR LABS
If Adobe CC isn’t already installed, use the Lab installers found at files.byu.edu\Software\Common\Adobe\Adobe CC\CC-Lab (.pkg for Mac, .msi for Windows).
Lab users will need to sign in with their NetID@byu.edu, password, and Duo as normal.
“You don’t have access to manage apps” error message
This sometimes happens even if the user has full permissions. To fix it follow these instructions:
Windows 10:
Sign out of the Adobe Creative Cloud Desktop App.
Browse to the following folder: C:\Program Files (x86)\Common Files\Adobe\OOBE\Configs
Delete the ServiceConfig.xml file.
Open the Adobe Creative Cloud Desktop App and sign in.
The apps should now show when clicking Apps from the top menu.
Mac:
Sign out of the Adobe Creative Cloud Desktop App.
Click Go from the menu at the top of the screen.
From the list, choose Go to folder.
Copy and paste /Library/Application Support/Adobe/OOBE/Configs into the search box then click Go.
Click the ServiceConfig.xml file and choose Move to Trash.
Open the Adobe Creative Cloud Desktop App and sign in.
The apps should now show when clicking on Apps from the top menu.
Note: If you don’t sign out before deleting the ServiceConfig.xml, the apps will not show and you will need to sign out and back into Adobe Creative Cloud.
Click on Word (or any of the other applications) and it should prompt you for a Microsoft sign-in username. Put the person’s netID@byu.edu, and it should redirect to a BYU page asking for their password. After they enter their password, it should redirect to a Duo push (which won’t be remembered for 30 days even with the checkbox) and it should sign in.
Remember that each person can only have 5 devices that are signed in with their account, so if you are loaning a laptop to a professor, try to have them sign out of the laptop after they are done using it.
Outlook Application For Professors:
Either on Mac or Windows, you should just be able to enter their NetID@byu.edu and it should work. If it fails to connect on Mac, you can try it with the server as mail.byu.edu, and the Domain as BYU\netID@byu.edu but usually if you got to this step, its a bad internet connection or they entered their password wrong.
If all goes well it should ask for a Duo push (which won’t be remembered for 30 days even with the checkbox) and it should sign in.
Outlook Online for Professors:
If the professor is used to getting to their email through the Web App, or if Outlook refuses to work, email should always be accessible through their favorite browser. This is also a good way to check if Outlook is broken or if they just don’t have an email account yet (sometimes it takes a few days if they just got hired).
Open their favorite browser
Go to office.byu.edu
Have them sign in and do the Duo push
Click on the Outlook icon on the top row
It should open their email in the Web App, which you can now bookmark for them if they want
Downloading Office:
Office should already be on every computer by default (through the initial imaging), but if you need to re-download it to fix it or upgrade etc. then:
Go to office.byu.edu
Have the professor sign in and do the Duo push
In the top right, there should be a button that says “Install Office”
Click it and then “365 apps”
A install file should start downloading
Run it, and you will have to have the person sign in again (instructions above)
Posted inGeneral, Software|Comments Off on Microsoft Office Setup
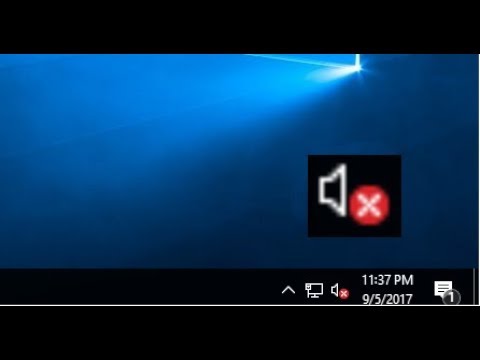
We’ve been seeing the Windows Audio service on Windows 10 break on a lot of the 7440/7450 AIOs, especially when the user isn’t an Administrator (Adjuncts, part time secretaries, etc). No sound comes out of the speakers or audio jack and it looks like this on the taskbar:
Double clicking on the icon and putting in Admin credentials fixes it temporarily, but it breaks again after a while (usually after restarting the computer).
To permanently fix this, log into the humsupport account:
Run “services.msc” from the Start/Run menu
Double Click on the Windows Audio Endpoint Builder service
Go to the Recovery tab
Change Subsequent Failures to Restart the Service and hit Apply
Restart the computer
The sound should be working upon restart and stay working upon subsequent restarts.
Posted inCSR Documentation, Windows|Comments Off on How to Fix Broken Audio (Red X) on Windows 10 AIOs
NOTE: This is only for Windows. On Macs, you can open Self Service and it’ll be under Printers on the left hand sidebar.
Pretty much all of the Adjuncts in the JKB need access to the Pharos Open-Access Printers (BYU Public Color/B&W) in the hallways.
Open a web browser, go to software.byu.edu, sign in.
On the left hand side under vendors, go to Pharos
Click Download Now next to the Pharos driver you need (Windows 64-bit)
Hit the + to expand the Open Access Print Driver (Pharos) at the top of the list in My Downloads. Click Continue (external site), it’ll start downloading.
Run the EXE. Follow the installation dialogues.
Restart might be needed to get it working
Posted inPrinters, Windows|Comments Off on Installing Pharos Open-Access Printers