Map Network Drive on Windows

All,

There is an automatic drive mapping to the “asstcsr” folder on HumFileShare. This works IF you login with your NetID when using a Windows computer (MACs don’t work with Microsoft’s Group Policy drive mappings). If you login with any other user, you’ll (most likely) need to manually map the shared drive. Here is what you need to know.

HOSTNAME: humfileshare.byu.edu
SHARENAME: asstcsr

CHECKBOX: click “Connect using different credentials”

Windows-map-drive-using-Hostname
Windows-map-drive-using-Hostname.jpg
Windows-map-drive-credentials2

Putting it all together:

\\humfileshare.byu.edu\asstcsr

Each CSR has access to the “asstcsr” folder, which I also setup the sharename as “asstcsr” (it doesn’t have to be this way, they can be two different names). If you cannot connect, there is a permission or connection problem. Please contact me with any questions.

-Mark Wilson, Sr

Posted in CSR Documentation, General, Windows | Comments Off on Map Network Drive on Windows

Setting up Atrust T66 Thin Clients

Process for replacing the old N-Computing thin clients with the new Atrust clients.

Tools needed: medium-sized Philips head screwdriver; medium-sized flathead screwdriver; small pliers.

  1. Disconnect all cables from the old device.
  2. Unmount the N-Computing device. They are a bit tricky to remove from the mounting bracket. Try rotating the case clockwise and tugging firmly to remove.
  3. Screw the mounting bracket onto the Atrust device. Best way to mount is long dimension vertical, with video port on the same side as the video port of the monitor.
    Note: In the plastic bag with the mounting bracket is a smaller plastic bag with 4 small screws and 2 longer ones. The small screws are to attach the bracket to the client, the long ones are to attach the bracket to the monitor. (There will be 2 small screws left over)
    IMG_0951 IMG_0952
  4. Reconnect all the cables, including ethernet, video cable with DVI adapter, power cable,  and USB cables (keyboard, mouse, and extender).
  5. Boot the Atrust device. You should see the generic login screen.
  6. Click the Settings cog in the lower lefthand corner. Choose Network, then Host Name.
  7. Enter the hostname for the station you are installing. The naming convention is SILab<room number>-<station number>. See example below:ATrust_setup
  8. Notify Mark Wilson Sr. when you have completed a room or group so he can push out the boot up profile to the new devices.
Posted in ATrust Thin Clients, General | Comments Off on Setting up Atrust T66 Thin Clients

Adding a Sharp Printer

Do it in this order:

  • Google the printer
  • Download the correct driver package (if you do it without the package, it probably won’t work)
  • Install using the user friendly tutorial
  • Make sure they have a copy code in the “Job Handling” section
  • Print

GOOGLE THE PRINTER

  • Look at the printer and read off what type it is.
  • Type the name into Google and click on the SharpUSA website
  • Google Sharp

DOWNLOAD THE CORRECT DRIVER

  • select the correct Product (the printer name MX-M503n)
  • select drivers and utilities

Sharp driver1

  • If you want the mac
    • Click on the MAC OS Driver Package Software for the current Operating System
      • If you don’t know it, grab the latest one or look it up on the computer
    • Download it
    • Run the .dmg file
    • click continue after you type in the correct credentials.
    • Set up to the correct hostname given in the excel spreadsheet
    • (Ex. HcclCopier.byu.edu)Printer list location
    • Copy Code in Job Handling is totally different for macs.. See the end of this post
    • Print
  • If you want the windows (what this tutorial is done on ie. more detailed)
    • Click on the Windows 64 bit OS Driver Package
      • Be sure it contains PCL Drivers
    • Download it

INSTALL USING THE USER FRIENDLY TUTORIAL

  • May need to extract the files because they are zipped. Just click at the top where it says extractextract
  • Open the one containing PCL6 Drivers
    • When I made this tutorial it was (WHQL PCL6_PS_PPD Print Driver_64bit)
  • Install and Run the Application
  • When you starts up, select Custom Installation
  • Custom Installing Printers
  • Here, I always select LPR Direct Print (Specify Address)
  • Then type in the host name
  • Host name 1
  • Select the type that your printer is, or closest.
  • Select just the PCL6 Driver
  • PCL6 1
  • Default Printer is up to you. Just click yes for now.
  • The name is up to you as well. Make it easy for the professor.
  • Optional Name
  • Click Next to install the driver
  • It should say that it completed. Click OK
  • Now: go to the control panel and look at the printers, because it still isn’t set up.
    • Devices and Printers
    • Control Panel 1
    • Right click and select properties
      • Configuration
        • Auto Configuration
        • It should direct you on how to configure it.
        • If it doesn’t (use your best guess.)
          • Probably something like this: Four Trays, Saddle Stitch Finisher, 3 Hole Punch, that’s probably enough. click apply
    • Auto Configuration

COPY CODE/JOB HANDLING

  • Now you need to right click again on the printer
  • Control Panel 1
  • select printer preferences
    • Job Handling
    • Check box User Number
      • Type in the professor’s copy code (some don’t have one)
        • If they don’t know it, then call their secretary
  • Copy Codes are the number one printer issue in the department.
  • Make sure that if they are printing to the sharp, that they have the code in there.
  • (honestly it is mostly mac users that don’t put the copy codes in) see below

PRINT


<<SIDE NOTE>>

MAC COPY CODE/JOB HANDLING STUFF

  • Try to print something from word or from the internet or wherever
  • For Internet/pdfs
    • Print using system Dialog
    • Screen Shot 2017-05-19 at 1.05.57 PM
    • Show Details
    •  Screen Shot 2017-05-19 at 1.07.46 PM
    • Select where it shows Layout
      • Select Job Handling from the drop down
        • Go into Authentication
          • Type in copy code and Lock ItScreen Shot 2017-05-19 at 1.08.39 PM
  • That’s all there is to it.
Posted in Printers | Tagged , , , | Comments Off on Adding a Sharp Printer

Adding Someone to a Shared Drive

Here are the steps:

Find out the person’s netid (Ex. AB12)

Find out their department (Ex. University Writing)

Open up GROUP POLICY MANAGER

  • If you don’t have group policy manager go to this link
    • https://www.microsoft.com/en-us/download/details.aspx?id=45520
    • Or google search: download remote server administration tools windows 10
    • Download the x64 bit version
    • Install itDL WINDOWS 10 Group Policy
  • If you do have it and don’t know where it is
    • Start>Windows Administrative Tools>Group Policy ManagementGroup Policy 1

Find their specific shared drive in the top drive section (not computers) (Ex. UnivWr)

Group Policy 2

Click on the University Writing group under Security Filtering

  • Double click on the group or select properties
    • Under the tabs (General,Members,Members of, Managed by) select MembersGroup Policy 3
    • Type in the netid of the student into the object spaceGroup Policy 4

Once the students netid has been added, confirm that their id is shown under the members tab.

Next go to their office and connect the drive.

To connect the drive go to file explorer>This PC> click on the computer tab at the top> Map a network drive

  • Map Drive 1
  • Type in the file path if you know it. All of them start with \\humfileshare.byu.edu\
    • If I were helping to setup a connection for university writing the file path would be: \\humfileshare.byu.edu\uw
    • click on connect using different credentials
    • the box will pop up for authentication
      • Type in their netid and password. not yours.
        • If theirs doesn’t work then you did it wrong. Map Drive 2
  • IF YOU DON’T KNOW THE FILE PATH
    • type in the base file path \\humfileshare.byu.edu\
      • Uncheck reconnect at login
      • Check Connect using different credentials
      • Don’t click finish, click BROWSE
        • Type in YOUR credentials, not the students, not the humsupport stuff
          • If yours don’t work, talk to the boss (Mel Smith, Devin Asay) he will need to add you to an administrator list
        • Expand the humfilshare.byu.edu
          • select “depts”
          • Inside is a long list of Shared folders, those are the filepath names. (Ex. Humanities Advisement is humadvise)Map Drive 3
  • Now you may need to log out and log back in to stop the filepath from using your credentials
    • Go back to the previous steps and sign in using the students credentials to \\humfileshare.byu.edu\humadvise or \uw or \als  or whatever it is.


Posted in Software, Windows | Tagged , , | Comments Off on Adding Someone to a Shared Drive

How to Push Restore in CrashPlan Web Console

Open your favorite web browser and type in the URL crashplan.byu.edu

Up will pop this screen. Type in your NetID and Password

Screen Shot 2017-03-15 at 3.50.42 PM

Navigate to the person’s device that you want to push restore information.

Screen Shot 2017-03-20 at 3.54.17 PM

The icon you want to push is on the far right and is a clockwise circular arrow.

Screen Shot 2017-03-15 at 3.55.08 PM

Click it and this screen will pop up. Click on device under restore target and you will see a menu with options pop up.

Screen Shot 2017-03-15 at 3.55.23 PM

Click in target device area and start typing the name of the computer you want to restore files to, NOT the computer they come from.

Now select the target path and this will show up.

Screen Shot 2017-03-15 at 3.56.28 PM

Now navigate to the place you want the restored files to show up and select it.

Screen Shot 2017-03-15 at 3.55.36 PM

Next, you are going to choose what date you want to restore from. A calendar will show up and just navigate to the date you wish.

Screen Shot 2017-03-15 at 3.57.05 PM

Now you are going to navigate to the bottom of the screen and Choose what files from the backup you would like to restore. Click restore and the process will start.

Screen Shot 2017-03-15 at 3.57.59 PM

On the computer you restored to a folder will show up like so

Screen Shot 2017-03-15 at 3.59.09 PM

Then in the client of CrashPlan on their computer, it will show

Screen Shot 2017-03-15 at 3.59.58 PM

It will finish in about an hour or two depending on the size of the files and complexity.

Posted in CrashPlan | Leave a comment

Restarting the CrashPlan Engine

Restarting the CrashPlan service on the computer.

This is used to clear connection and cache corruption issues.

Navigate to CrashPlan on the computer and open it.

When at this screen you will either want to hit Command  Option and C at the same time for a Mac device or Control Shift and C at the same time.

Screen Shot 2017-03-13 at 12.45.35 PM

This will bring a list of commands you can make. From here you will want to type in Restart and hit Enter. After waiting for roughly 30 seconds open CrashPlan again and use the keystrokes above to enter the command line again. Then type Scan and hit Enter. This should clear Cache issues and some connection issues too.

Screen Shot 2017-03-15 at 3.44.56 PM


Posted in CrashPlan | Leave a comment

Setting up CrashPlan the First Time

Setting up CrashPlan the First Time

First you must have CrashPlan installed on the computer.

Sign into crashplan.com/login with your NetID@byu.edu, go to Administration -> Downloads. You should see a similar screen to:

And click the download button next to your operating system.

After you have the NEWEST version installed then you will want to search for it and open it. It will look like this when first opened.

Screen Shot 2017-03-13 at 12.34.55 PM

Make sure you select Everybody and not just one user. It is defaulted this way so make sure it stays like this.

The Username and Password are the NetID@byu.edu and Password of the Professor.

The new Server address is clients.us2.crashplan.com

Screen Shot 2017-03-13 at 12.35.29 PM

After this step, you will have a screen that will pop up. You will have two choices: Add New Device and Replace Existing Device. If this is a brand-new professor or the professor is getting another device, you will want to use Add New Device. Otherwise, you will be using Replace Existing Device.

Screen Shot 2017-03-13 at 12.37.28 PMScreen Shot 2017-03-13 at 12.37.46 PM

A list of devices will pop up and from there choose the correct device to replace.

Screen Shot 2017-03-13 at 12.38.18 PMScreen Shot 2017-03-13 at 12.38.58 PM

A page will show up asking you if you’d like to transfer files. In MOST cases, you will want to transfer files. Some cases you won’t want to transfer files. This is true if there was a sort of error and the files are still on the computer. These are special cases that are rare but will happen.

Screen Shot 2017-03-13 at 12.39.23 PM

At this point you will select all the folders that will be on the computer. This will most likely be everything that is backed up but it doesn’t have to be. They suggest restoring the most important stuff first and then doing batches later but you can do all at once. Just watch for errors if any happen and make sure the professor checks all their data.

Screen Shot 2017-03-13 at 12.41.05 PM

Once you select the files you will select where they go.

Screen Shot 2017-03-13 at 12.43.19 PM

If the professor has signed in you will want to choose Original Location. This will be the most common place but other places can be good if the situation permits. Use your best Judgment.

Screen Shot 2017-03-13 at 12.43.34 PM

If the file already exists, you can have it rename if you are concerned about the files already there if any. Otherwise, you will want to Overwrite the files.

Screen Shot 2017-03-13 at 12.43.45 PM

Current is usually best but the other option is okay.

Screen Shot 2017-03-13 at 12.43.54 PM

You will be asked if you want to transfer more files or continue. Most times you will have transferred everything so you can just hit continue.

Screen Shot 2017-03-13 at 12.44.21 PM

It will now have transferred the professor’s original CrashPlan settings.

Screen Shot 2017-03-13 at 12.44.36 PM

The professor will have to sign in again at this point and this is the point that everything will be restored.

Screen Shot 2017-03-13 at 12.45.02 PM

You will receive this screen and then they are good to go.

Screen Shot 2017-03-13 at 12.45.20 PM

Make sure that you have the entire Users folder selected and D drive selected to back up (when applicable).

In the Crashplan admin console, this is what happens and what will be seen. Before:

Screen Shot 2017-03-13 at 12.40.34 PM

After:

Screen Shot 2017-03-13 at 12.46.02 PM

Automatic adoption of the old device to the new one.

Posted in CrashPlan | Leave a comment

Installing printers on macOS

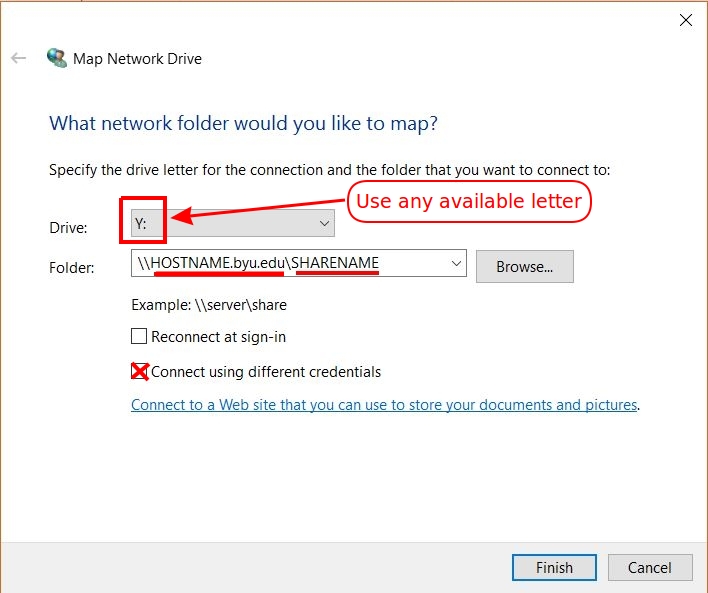
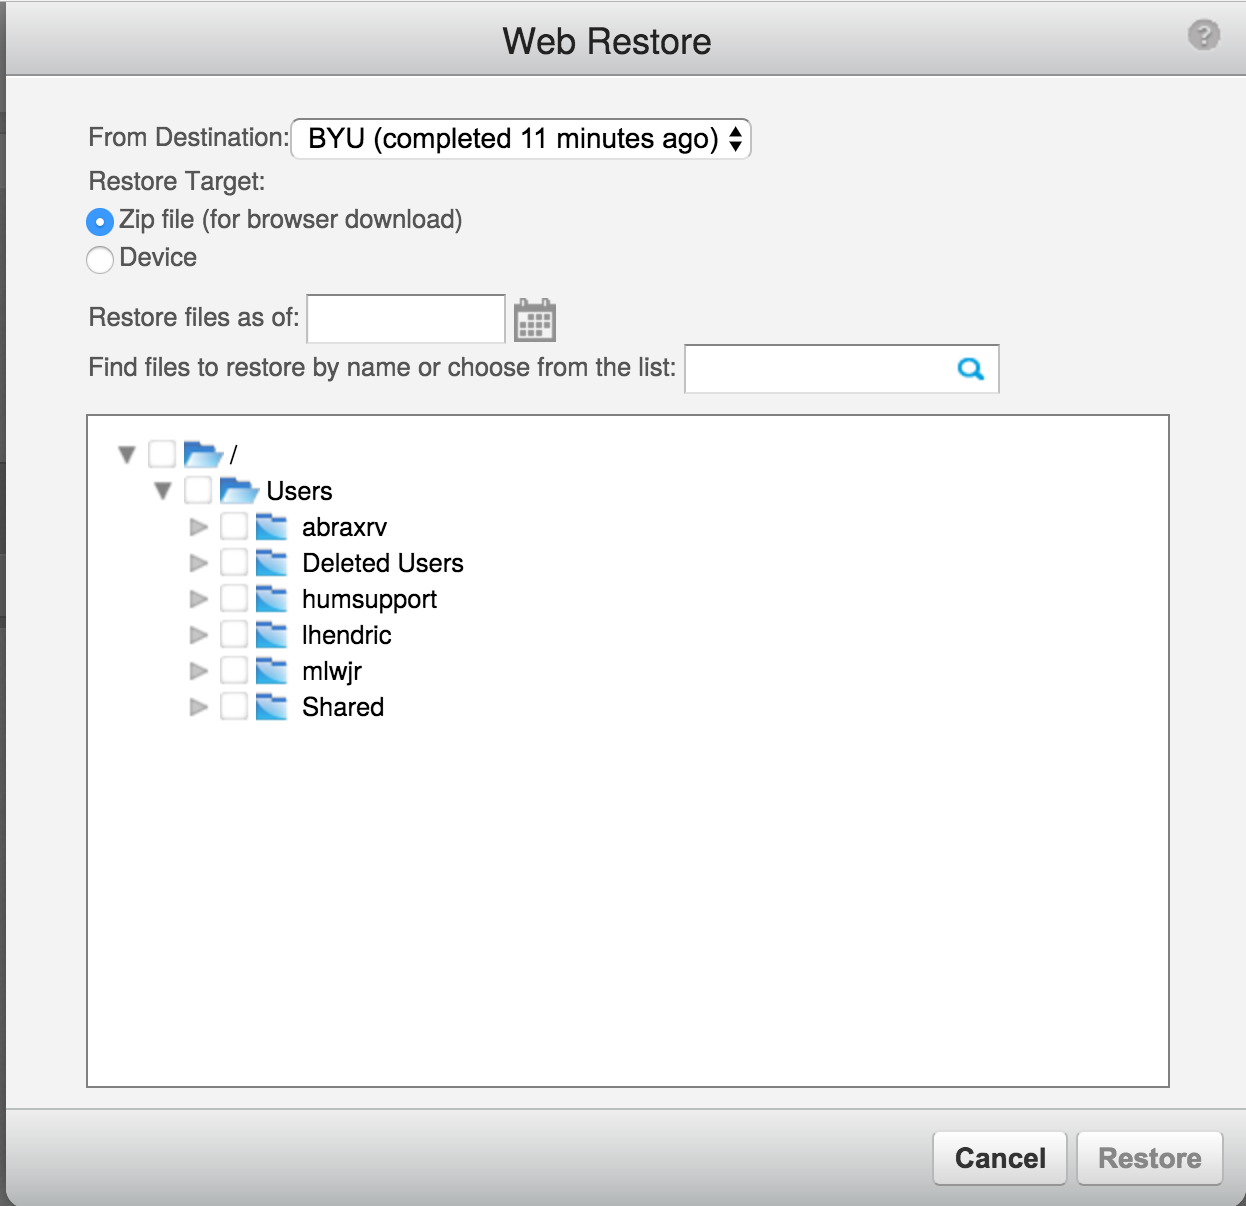
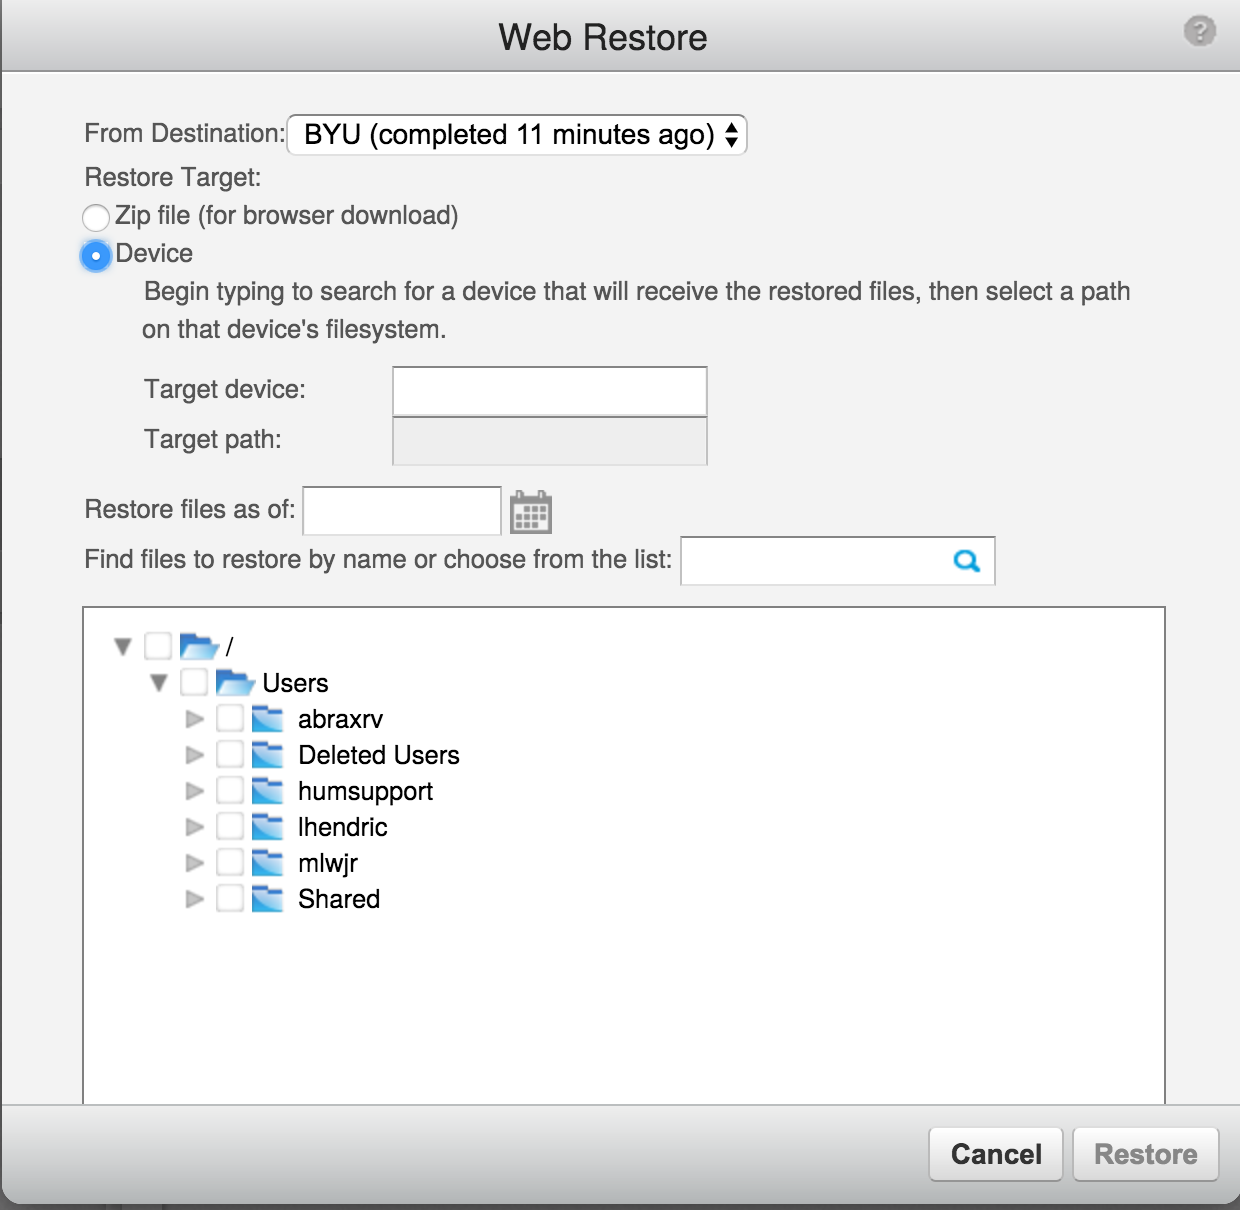
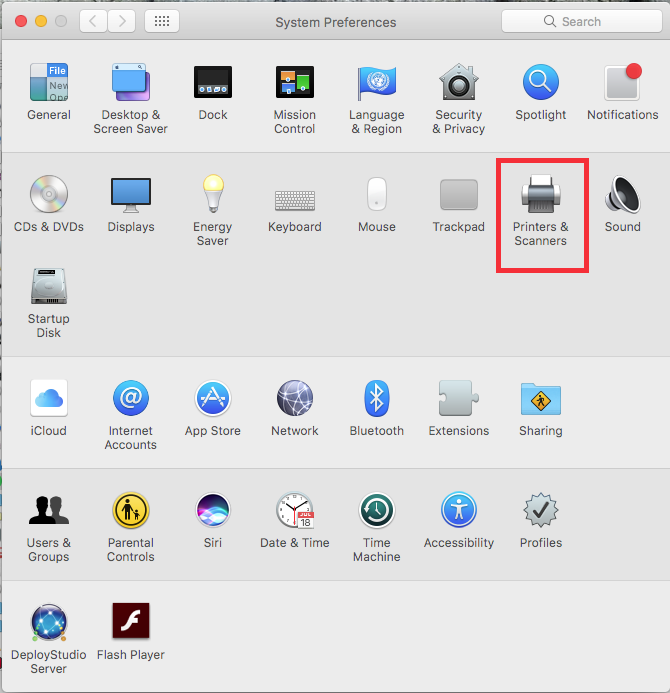
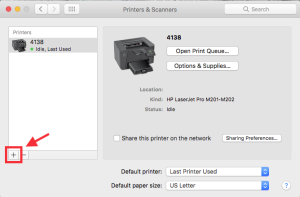
To add a printer go to the System Preferences, “Printers & Scanners.” screen-shot-2017-02-14-at-10-23-32-am1

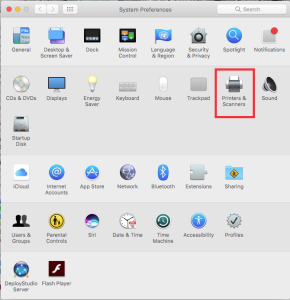
Click on the “+” button to add a printer.

screen-shot-2017-02-14-at-10-25-05-am

To add an HP printer, most of the time is enough to enter the hostname or IP address of the device you are trying to add.

screen-shot-2017-02-14-at-10-25-27-am1

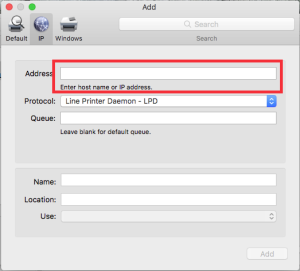
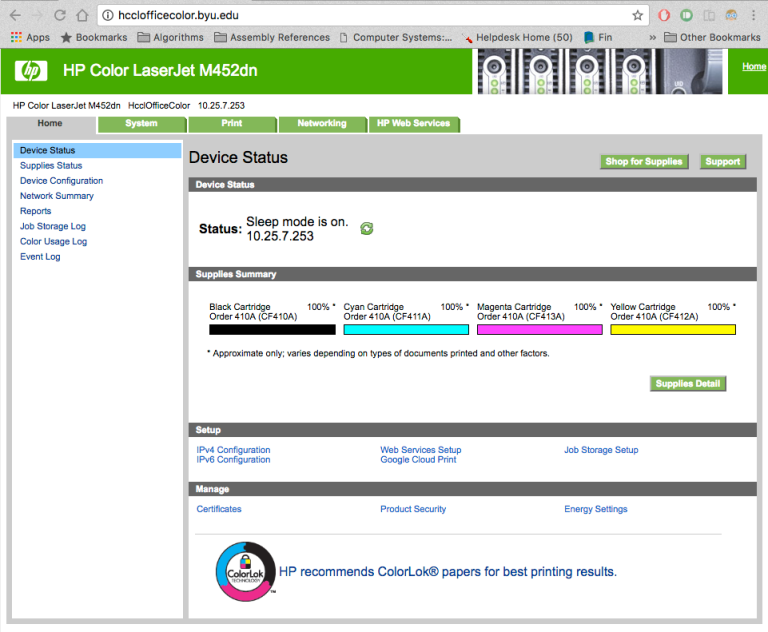
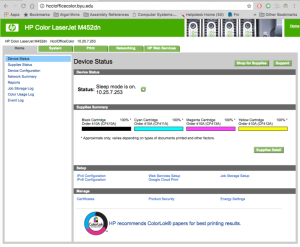
However, sometimes the printer is offline, or the device database has not been updated and then it will suggest adding a generic driver. For simple text printing a generic driver for an HP printer should work, but formatting and quality issues appear when the document has heavy formatting or contains images. In case a generic driver is suggested, verify that the printer is on and that it corresponds to the device you are trying to access. For example, if the hostname is hcclofficecolor.byu.edu, type the address in a web browser and verify the make and model.

screen-shot-2017-02-14-at-10-35-59-am

For newer models, it might suggest a generic driver even if the printer is on. I have found that using the HP configuration utility works very well.

On 02/14/2017 I found it at http://h20564.www2.hp.com/hpsc/swd/public/readIndex?sp4ts.oid=7527721&swLangOid=8&swEnvOid=4226. The installation should be pretty easy to follow and it will allow you to enter the hostname and add the printer.screen-shot-2017-02-14-at-10-43-05-am

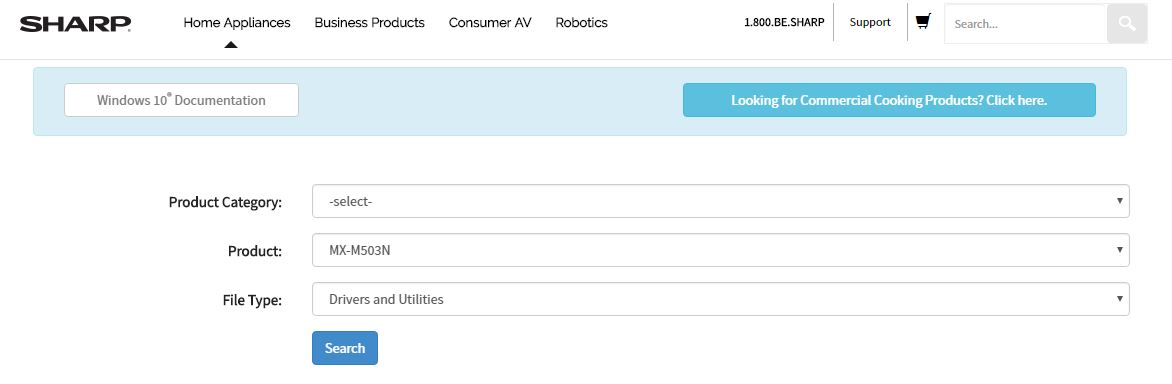
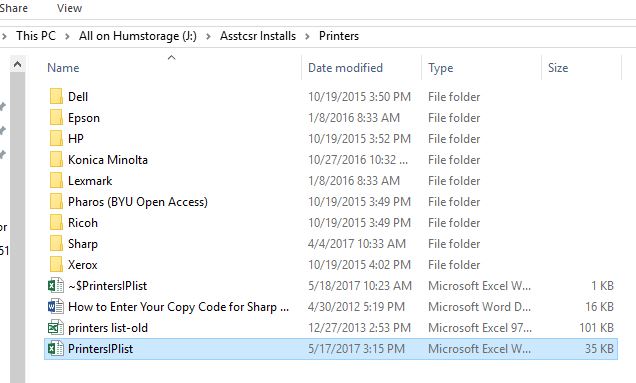
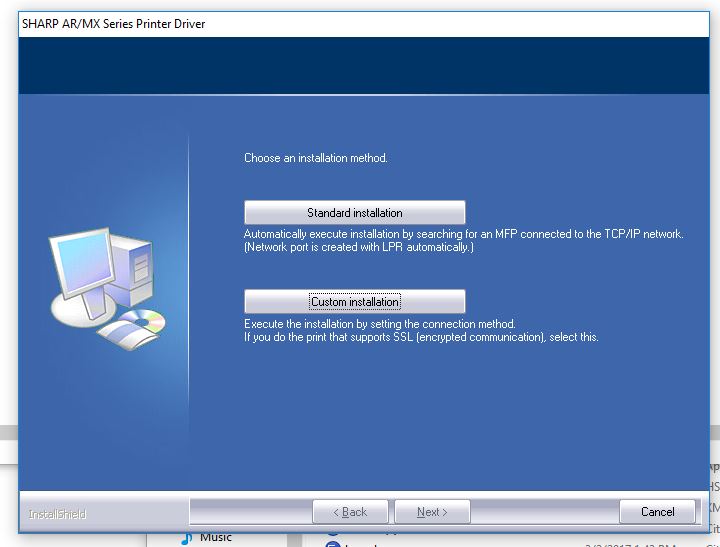
If you are trying to add a Sharp copier, you will have to first install the correct driver, and then add the printer as described above.

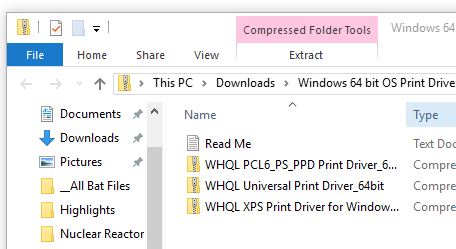
Most of the time the drivers are already located in smb://humstorage.byu.edu/All/Asstcsr Installs/Printers. Make sure you install the driver corresponding to the release. i.e. El Capitan, Sierra, etc.

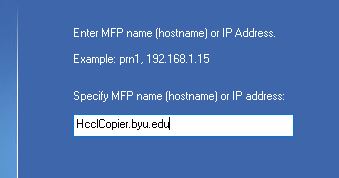
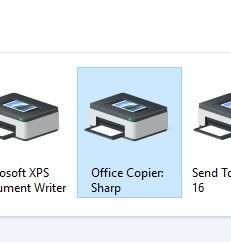
Once the driver has been installed, when typing a valid hostname, it will autodetect the model. If the model matches one of the divers installed, it will show it as shown. Click “Add.”

screen-shot-2017-02-15-at-8-04-14-am

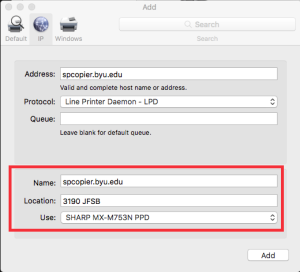
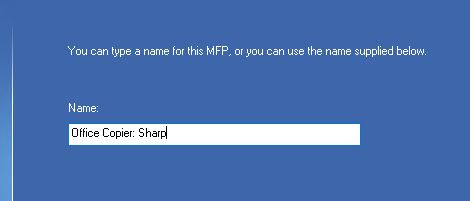
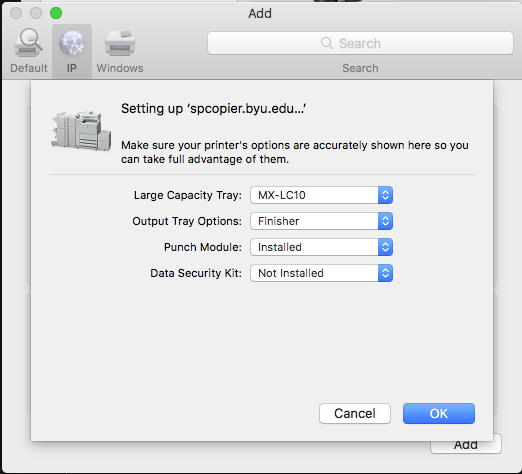
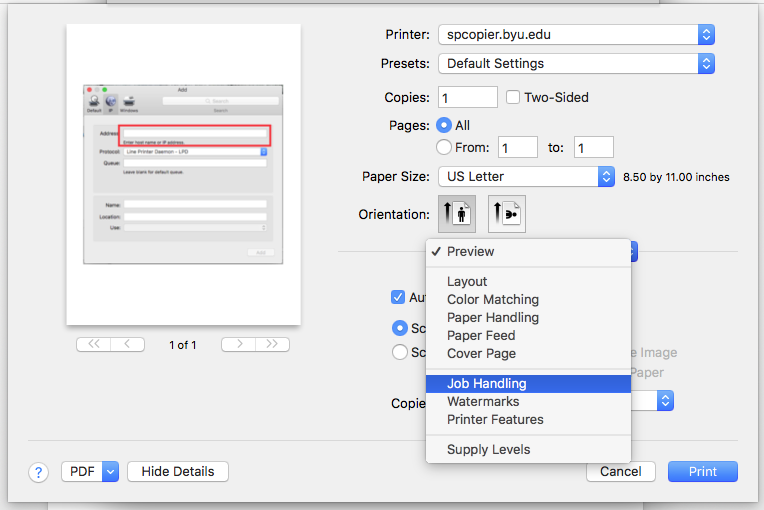
If the device you are trying to add is a Sharp copier, you should see a menu like the following.

screen-shot-2017-02-15-at-8-04-39-am

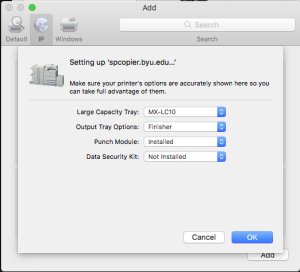
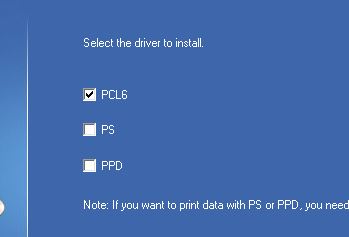
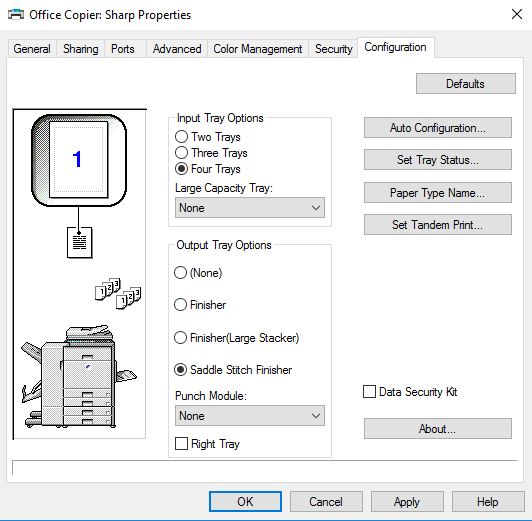
As of today, we don’t have a list of the correct configuration for each device, but the settings shown above seem to work for most people.

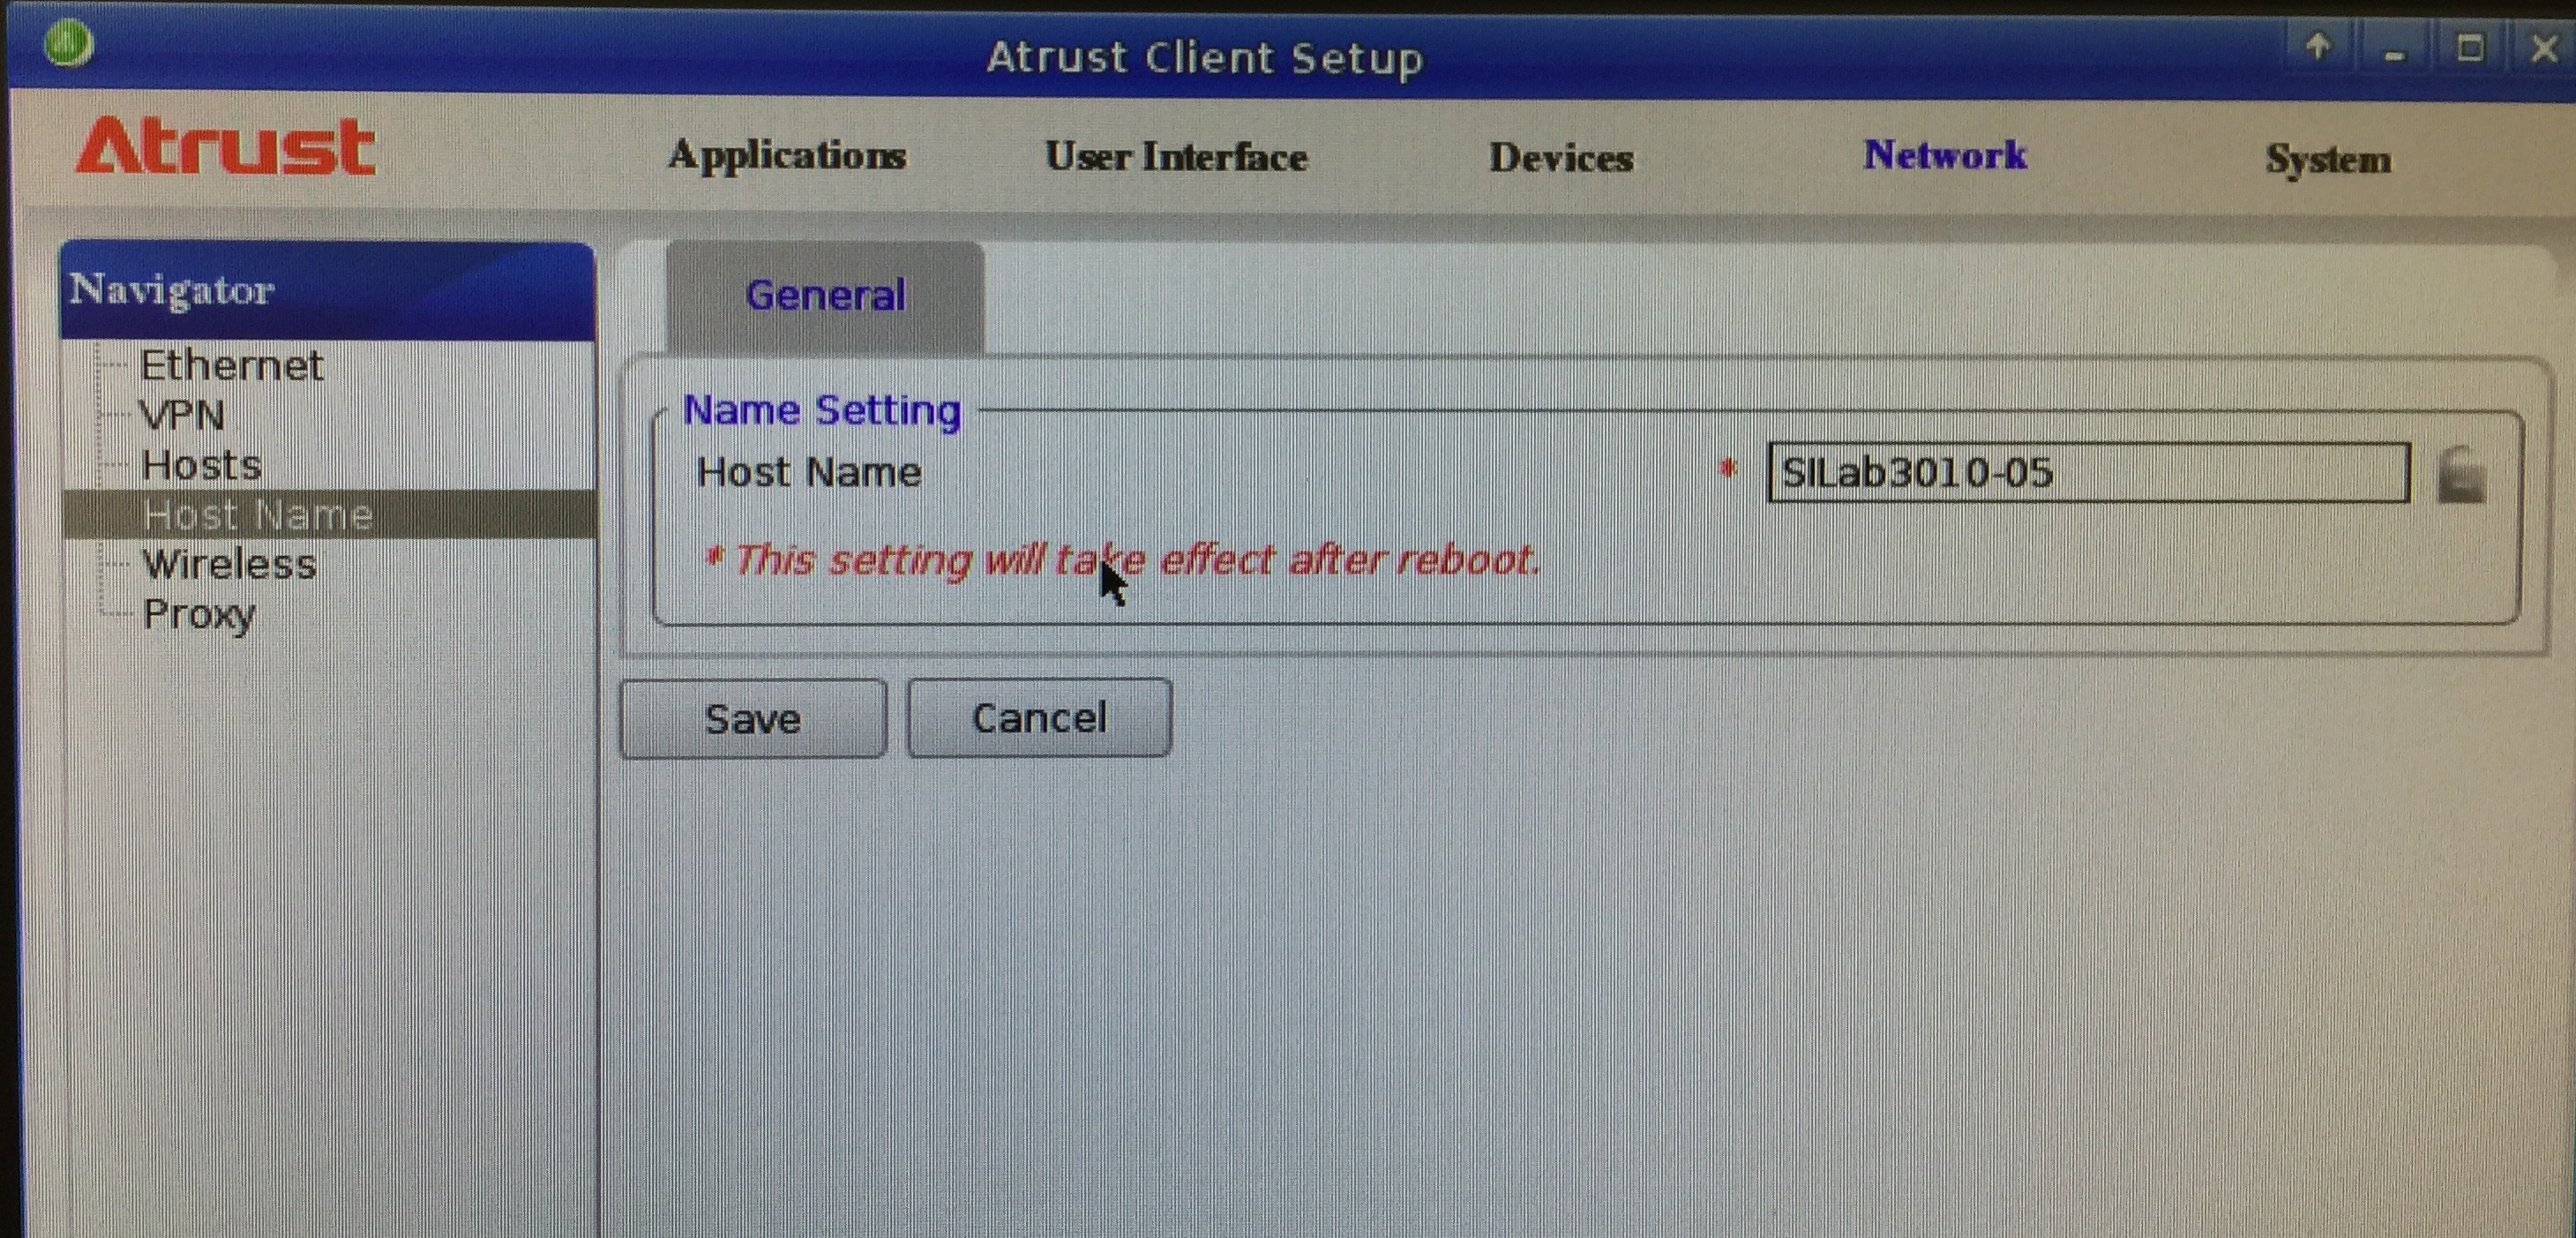
Once the printer has been installed, some departments require a printer code. It usually is a five digit number (except Chinese Flagship, their code is 01).

NOTE: Only add the printers that the person will need. For example, if in the printer list it says “Faculty” and the client is a professor, then add it. If it says “PT sec,” you should not add it.

screen-shot-2017-02-15-at-8-09-58-am

Adding the Printer Code

Microsoft Office

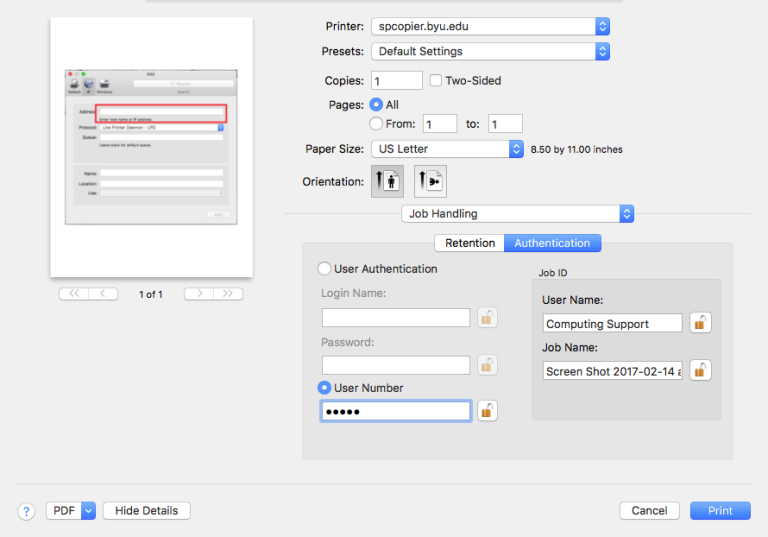
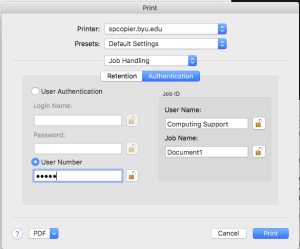
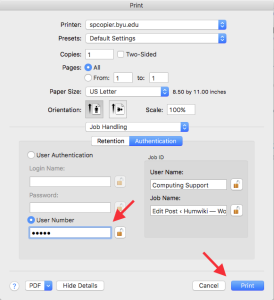
In Microsoft Word, it is usually pretty straight forward. Just hit print and the following window will pop up. Change the tab to “Job Handling,” Enter the code in the “User Number” DO NOT USE THE USER AUTHENTICATION SECTION. Lock the field. Hit print.
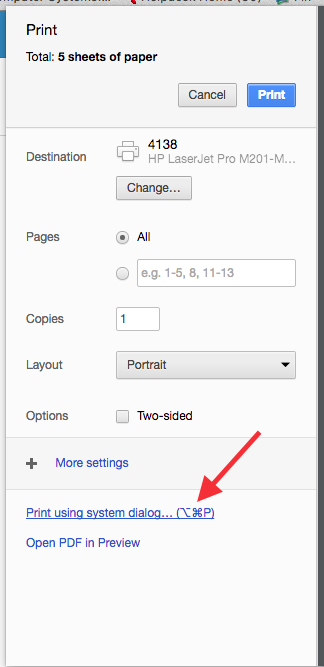
screen-shot-2017-02-15-at-8-05-41-am

Google Chrome

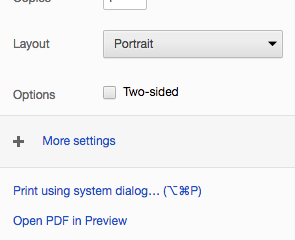
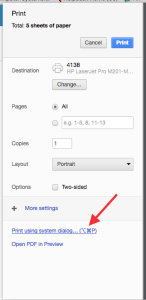
If the printer requires authentication, just hitting the print button will not work even if they have previously typed the code. Click on the “Print using system dialog…” option.

screen-shot-2017-02-15-at-8-08-28-am1

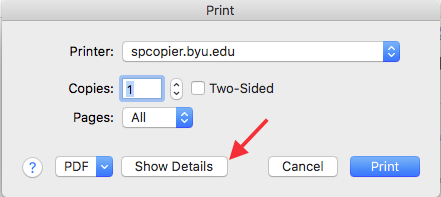
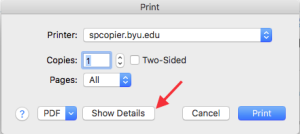
The following menu will show up. Click “Show Details.”

screen-shot-2017-02-15-at-8-08-38-am1

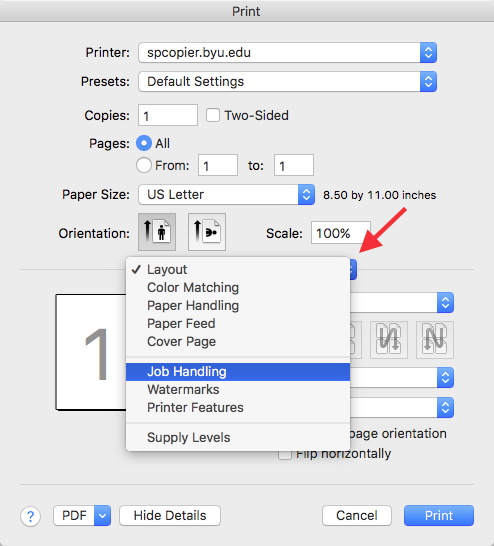
Click on the Layout tab and change it to Job Handling.

screen-shot-2017-02-15-at-8-08-47-am1

Enter the code. Lock the field. Hit Print.

screen-shot-2017-02-15-at-8-09-05-am1

Preview

The process is fairly similar. Hit “Show Details.”

screen-shot-2017-02-15-at-8-06-10-am

Change the tab to “Job Handling”

screen-shot-2017-02-15-at-8-06-23-am

Enter the code. Lock the field. Hit Print.

screen-shot-2017-02-15-at-8-06-36-am

NOTE: If you don’t hit print, it will not save the configuration.

–Abraham

Posted in CSR Documentation, Hardware, Mac, Printers | Leave a comment

VPN and Windows Licensing

A user working from home had trouble with Windows. His screen would go black with a message that “this copy of Windows is not genuine.” He remembered that the fix had something to do with VPN.

(The problem was that he was not on the BYU VPN, so Windows was not communicating with the licensing server.) Here was Mel’s reply:

The VPN software should be installed on your system already if we did this before. All you should have to do is execute it and then wait a few minutes until Windows gets re-authenticated. To do this, find the VPN software in your program list under the All Programs folder of the START menu (lower left corner). Look for Cisco Anywhere and run the executable. If you choose the right one, it will show a screen asking you to authenticate with your netid credentials. Of course, you must be connected to the internet for this to work. Assuming you do this correctly, an icon should appear in the system tray (lower left bottom of the screen that looks like a world with a locked lock on it). This puts your system on the BYU network and it should see the licensing server that updates Windows copies. I’d leave the system connected and wait an hour or so, then check to see if it updates, which it should automatically. I’m assuming you still have windows 7, so click the START menu, then right mouse click THIS COMPUTER, then select PROPERTIES. Scroll down to the bottom of the dialog box that opens and check the Windows Activation section. If it worked, it should say “Windows is activated.”

Posted in CSR Documentation, Windows | Leave a comment

Setting up a new BYU email account

Setting up an email account is fairly simple. All department secretaries should have access rights to do this.

  1. Go to it.byu.eduScreen Shot 2017-02-27 at 11.51.16 AM
  2. In the search box next to the login box, type “email” and click the magnifying glass.
  3. Click the resulting link “email,” usually the third one down. This will take you to the premium email account order page.
  4. Click Order, then select “Order Service” from the drop down menu.

    BYU OIT order email link

    Click the Order link at upper right, then Order Service.

  5. If you haven’t already authenticated earlier to BYU with another application or web page, you’ll be asked to authenticate. Enter your netid and password.
  6. Fill in the appropriate boxes. It doesn’t matter who orders the service (it could be a CSR or a department secretary).
  7. Enter in the account type (usually, “employee”, the default).
  8. Enter who the account is for. The name must be correct or you might select the wrong person. The page will verify the name after you select the next box. If it remains red, the name isn’t verified and you won’t be able to finish the order. This usually happens if the person has not been hired yet.
  9. Enter the desired email address for the person. Usually, we just follow the firstname_lastname@byu.edu) pattern
  10. Enter the department’s account code for recurring charges–about $3.50 a month for employees who are not full-time. The full-time accounts are free. The account code is in the format 11xxxxxx-6140-00000. I use the 6140 account type so that it shows up on the department’s monthly OIT bill. The account code will be verified when you click out of the box and will indicate the department that is responsible for the code.
  11. Click the “Instant Order” button on the top right.

You should get an email from OIT showing the request has been made and another one when it has been fulfilled, usually within a few minutes. At that time, the person can log into their account either by using Outlook or by the web mail client at mail.byu.edu.

Posted in CSR Documentation | Leave a comment